From previous post, I learned that the lever tab needs to be adjusted.
(peen the tab )
Question, How hard is it to get the lever removed ????
Do I need to disassemble the whole gun or can i just remove the lever??
Which Screw ???
I have searched the Net, found several 'dissasemble instructions, but
still not sure.....
Tried the US repeating site, could not find a schematics/parts list drawing..
Winchester Lever Action ( 356W) Jamming fix, Help???
Forum rules
Welcome to the Leverguns.Com General Discussions Forum. This is a high-class place so act respectable. We discuss most anything here other than politics... politely.
Please post political post in the new Politics forum.
Welcome to the Leverguns.Com General Discussions Forum. This is a high-class place so act respectable. We discuss most anything here other than politics... politely.
Please post political post in the new Politics forum.
The tab is on the upper surface of the lower link.
To remove the lower link, a screw, the lever and three pins need to be removed first.
But, before that - make sure the rifle is empty !
Then, remove the very large (largest) cover screw, located on the upper left receiver wall. With the screw out, use the lever to partially withdraw the bolt, until it's lever pin aligns with the screw hole you just emptied.
Flip the rifle over, then tap the lever pin out, towards the left as you view the sights, using the smaller hole on the right side of the receiver.
The lever is now free of the bolt - let the bolt be.
Remove the pin connecting the lower link to the lever, and then the pin holding the forward end of the lower link in the receiver - and withdraw the lower link to work on it.
Assemble in reverse order.
-
J Miller
- Member Emeritus
- Posts: 14906
- Joined: Sat Mar 31, 2007 7:46 pm
- Location: Not in IL no more ... :)
oldmax,oldmax wrote:Thanks, Got it out, tryed the adjustment technique
Didn't work, Time for Silver solder,
Question; If you get a new lever , will the problem be fixed or are
the stock parts also to short???
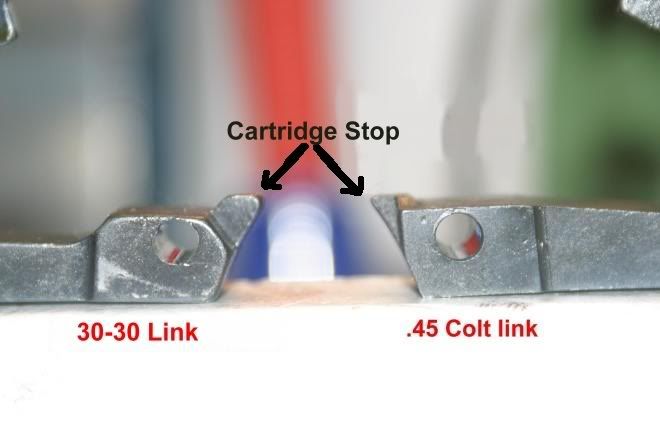
You keep referring to the lever, the problem is not with the lever, it is with the cartridge stop on the link.
Look at the tab extending from the top front of the link in this picture. The link is resting on the yellow surface with the front pointing to the right. The cartridge stop is the little tab at the top right of the link:

The one on your rifle should look like this. If it doesn't then it might need some brazing or welding. I doubt silver solder will be durable enough. Never hurts to try though.
There have also been several variations of the link itself, so don't be too concerned if your does not look exactly like the one in my picture.
There have been several guys on this forum who have replaced their links and have reported the under the carrier jams have ceased.
I suppose that if the tolerances stacked wrong then a new one wouldn't help, but I'd bet against that happening.
Joe
***Be sneaky, get closer, bust the cap on him when you can put the ball where it counts  .***
.***
-
J Miller
- Member Emeritus
- Posts: 14906
- Joined: Sat Mar 31, 2007 7:46 pm
- Location: Not in IL no more ... :)
oldmax,There have also been several variations of the link itself, so don't be too concerned if your does not look exactly like the one in my picture.
I have several links, a couple different vintages and calibers and no two are exactly the same.
Here is a pic that shows how the cartridge stop should set when the action is closed. It might give you a better idea of how it works.
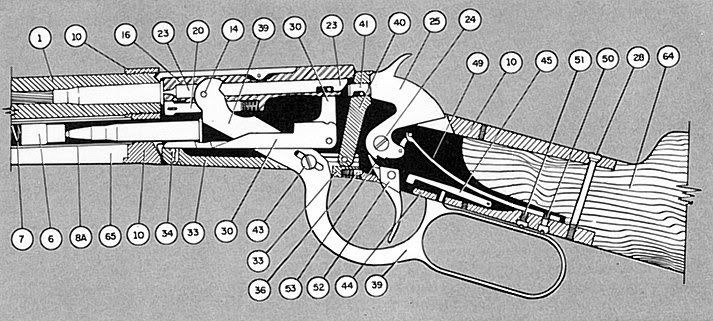
You can see the cartridge stop just in front of the end of the carrier (30). When the action is closed the top of the stop is horizontal and the cartridges just slip right over the top of it. When the action is open the link pivots down and the tip of the stop tilts up and blocks the cartridges from exiting the magazine.
Here is another pic showing two different links. They are the same but different. Don't worry about the variation in design, just concentrate on the function.
Joe
***Be sneaky, get closer, bust the cap on him when you can put the ball where it counts .***