OT - Sixgun Wear, What you should expect:

Welcome to the Leverguns.Com Forum. This is a high-class place so act respectable. We discuss most anything here ... politely.

Moderators: AmBraCol, Hobie

Forum rules
Welcome to the Leverguns.Com General Discussions Forum. This is a high-class place so act respectable. We discuss most anything here other than politics... politely.

Please post political post in the new Politics forum.
Post Reply
User avatar
Griff
Posting leader...
Posts: 20883
Joined: Sat Mar 31, 2007 4:56 pm
Location: OH MY GAWD they installed a STOP light!!!

OT - Sixgun Wear, What you should expect:

Post by Griff »

On another thread, the following query and one answer was posted. In order not to hijack that topic, I thought I'd start another.
RSY wrote:
spurgon wrote:Griff
Does "any" line on the cylinder mean that the timing is off or just a line that is as heavy as the one i the picture indicate that the timeing is off? Trying to learn something new every day.
spurgon
That's normal wear over time for any revolver that's been manually cocked.
If it really drives you nuts, get a Birchwood-Casey bluing pen and touch it up. Then, be prepared to repeat every week thereafter. :?
scott
Well, not to be argumentative, but yes. However, it really depends on what your expectations are. IMNSHO, most single actions are out of time. It's just that what most folks do with them doesn't require the exquisite timing they are actually capable of.

Here's a picture of an Jager (Itlay) SAA clone that I bought for my wife and son, and used for about 8 years or so of their cowboy action shooting.
Image
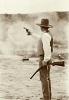
This is an unrefinished gun, that was tuned by Bob Munden in early 1986 before ever being used in competition. For 3 years in CA we competed in about 2-3 matches a month, plus 3 big ulti-day matches a year. From '90-'93 we competed in at least one monthly match, plus 3 or 4 annual matches per year. I'm at a loss to calculate the number of rounds that have been thru it in matches and practice. At if you might think it was never shot fast, my son won the Top Gun shootoff at Raton in 1992 shooting five rounds on five targets at distances of 7 to 35 yards in 5.32 seconds. In the world of CAS, Raton's match uses the smallest targets at the longest distances, much more challenging that most SASS matches.

Short story, there is no thick heavy line around the cylinder. They don't show up in the picture, but there are some very fine, light markings... probably caused during loading or maintenance and lack of attention by... the primary cleaner of weapons in my house... me.
Image

Cowboy action shooting is hard service for single actions. I don't believe they were really designed for the speeds at which many top shooters are operating their guns.

Image
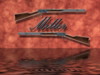
The above picture is a shot of my 1851 Armi San Marco. It too has been used in cowboy action shooting. I bought this gun in early 1986 and started practicing for the 1987 EOT where I finished in 5th BP. Same placing in 1988. I skipped EOT 1989 and went to the new BP Cartridge class in 1990. So, I shot for three years solid with this revolver in competition, probably a total of a little over 40 matches. It was also tuned, (but not by Bob Munden) prior to any use in competition, but you will see it has some heavy marking about 1/8" before the ramp as the bolt rises slightly early. In addition, it has some dimpling over the rest of circumference.
Image
I don't know what that is from, maybe Nate will chime in with an opinion. I have also started using this gun again in our local matches.

A properly timed sixgun will, IMO, have the bolt remain inside the frame until the ramp is over it; rising into the ramp and be fully engaged as the locking slot comes around. This will leave marks in the ramp and locking slot. The bolt then must fall before the hand engages the cylinder as the hammer is pulled back to ensure the bolt completely clears the locking slot before the cylinder begins its rotation.

Now, is it abnormal for a revolver to show such markings? No. And for most uses, where speed is not a factor, such slightly out-of-time indications will not hamper the guns function, only its beauty.

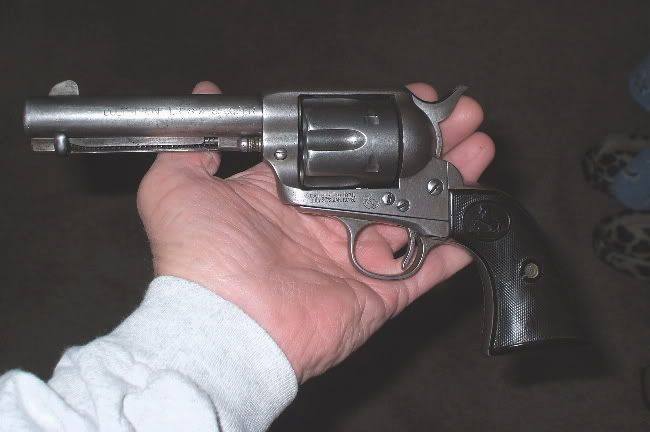
Lastly here is a view of one of my Colt SAAs tuned by Bill Oglesby of Oglesby & Oglesby in Springfield, IL. Again, you'll see there are no lines around the cylinder. This is also a well and hard used competition gun.
Image

You're free to come to your own conclusions, but maybe you'll see why I hold to mine.
Griff,
SASS/CMSA #93
NRA Patron
GUSA #93

There is a fine line between hobby & obsession!
AND... I'm over it!!
No I ain't ready, but let's do it anyway!
RSY
Senior Levergunner
Posts: 1082
Joined: Sat Mar 31, 2007 5:09 pm
Location: Georgetown, TX

Post by RSY »

I have to admit your Colt looks amazing.
User avatar
JReed
Advanced Levergunner
Posts: 5509
Joined: Tue Apr 03, 2007 11:17 am
Location: SoCal

Post by JReed »

Very nice
Can this be fixed on the Rugers also? I have noticed that they can be pretty bad when it comes to bolt rub.
Jeremy
GySgt USMC Ret

To err is human, To forgive is devine, Neither of which is Marine Corps policy
Semper Fidelis
User avatar
J Miller
Member Emeritus
Posts: 14885
Joined: Sat Mar 31, 2007 7:46 pm
Location: Not in IL no more ... :)

Post by J Miller »

Old style single actions with includes most all the cap and ball revolvers, the Colt SAA and copies, and the Old Model Rugers will not ring the cylinder UNLESS one of two things happen. Mechanical wear or failure ~OR~ operator error or mishandling.

Griff's dissertation is 100% dead nuts on.

Now, New Models Rugers are another thing altogether, they just ain't normal.


Joe
***Be sneaky, get closer, bust the cap on him when you can put the ball where it counts ;) .***
User avatar
J Miller
Member Emeritus
Posts: 14885
Joined: Sat Mar 31, 2007 7:46 pm
Location: Not in IL no more ... :)

Post by J Miller »

This is appropriate to this thread as mishandling is probably the worst cause of ringing SA revolvers cylinders. I put this together some years ago as a tutorial for single action shooters.
Posted on THR 5-27-05 by J Miller
(Edited and updated 11-17-06)

How to load single action revolvers.

To properly load an OLD STYLE single action revolver, (This includes all unconverted Old Model Rugers, Colts, Colt copies, Remington originals and copies, Great Westerns, Interarms Virginian Dragoons, and many others):
>Pull hammer to half cock.
>Open loading gate.
>Rotate cylinder to load or unload; LOAD one (1), SKIP one (1), LOAD four (4).
>Close loading gate
>Leaving the cylinder in this position, in other words do not turn it, pull the hammer all the way back to full cock and then with your thumb holding the hammer back, pull the trigger and gently lower the hammer to rest.
The hammer will then be resting over an empty chamber.
>Never, ever lower the hammer from the half cock position. Always bring it all the way back to full cock before lowering it back down. When you lower the hammer from half cock, the bolt rises up between the notches and it is a surefire way to ring the cylinder of your revolver.

Doing this will also index the cylinder so that the cylinder latch (bolt) does not drag on the cylinder as it rotates. If for some reason you have to interrupt your loading sequence, or lower the hammer at the wrong time, DO NOT TURN the cylinder as the bolt has risen up and is pressing against it. Turing the cylinder at this time will cause drag marks. To get the cylinder back to it's locked position without creating a drag mark, simply pull the hammer back to full cock and lower it. This will put everything back in sequence.

To demonstrate this for those not familiar with how to handle the old type SA revolvers, I will follow the above directions and then point the gun at a target and pull the trigger. IF I followed the directions all you will hear is a dull thwack. If it fires, I did something wrong. Most of the time the neophytes jump out of their boots when the hammer goes thwack.

To load or unload a New Model Ruger:
>Flip open the loading gate.
>Load or unload the cylinder.
>Gently hold the cylinder back against the pawl (hand) and close the loading gate.
Holding the cylinder against the pawl greatly reduces the drag marks caused by the cylinder latch.

To load or unload a New Model Bearcat or a converted Old Model Ruger SA:
>Pull hammer to half cock.
>Open loading gate.
(If you want to load five:)
>Rotate cylinder to load or unload; LOAD one (1), SKIP one (1), LOAD four (4).
>Close loading gate
>Leaving the cylinder in this position, in other words do not turn it, pull the hammer all the way back to full cock and then with your thumb holding the hammer back, pull the trigger and gently lower the hammer to rest.
The hammer will then be resting over an empty chamber.
(If you want to load six:)
>Rotate cylinder to load or unload.
>Pull the hammer all the way back to full cock and then with your thumb holding the hammer back, pull the trigger and gently lower the hammer to rest. After the hammer passes the half cock notch you can release the trigger and the transfer bar will drop away from the firing pin.
***Be sneaky, get closer, bust the cap on him when you can put the ball where it counts ;) .***
User avatar
Griff
Posting leader...
Posts: 20883
Joined: Sat Mar 31, 2007 4:56 pm
Location: OH MY GAWD they installed a STOP light!!!

Post by Griff »

JReed wrote:Very nice
Can this be fixed on the Rugers also? I have noticed that they can be pretty bad when it comes to bolt rub.
Jeremy, I'm absolutely sure they can. I'd bet that any of the Ruger smiths are NOT going to let one of their custom guns get out the door with any mechanical issues. I just ain't familar enough with Ruger afficionadoes to recommend a tune-up artist. I'm sure that some here have had theirs done and could provide a recommendation. Oglesby's bread and butter are his custom 1911s, but, he has a soft spot for Colt SAAs on a personal level. I seem to recall that he shot Rugers himself, and as fast as he can be, they're probably very well setup. The Colt pictured above, has no mechanical issues, but it'll be visiting Bill soon to be re-worked to match its twin in the safe he did for me last year.
Last edited by Griff on Sun Jan 20, 2008 5:09 pm, edited 1 time in total.
Griff,
SASS/CMSA #93
NRA Patron
GUSA #93

There is a fine line between hobby & obsession!
AND... I'm over it!!
No I ain't ready, but let's do it anyway!
User avatar
JReed
Advanced Levergunner
Posts: 5509
Joined: Tue Apr 03, 2007 11:17 am
Location: SoCal

Post by JReed »

Thanks Joe.
Jeremy
GySgt USMC Ret

To err is human, To forgive is devine, Neither of which is Marine Corps policy
Semper Fidelis
User avatar
J Miller
Member Emeritus
Posts: 14885
Joined: Sat Mar 31, 2007 7:46 pm
Location: Not in IL no more ... :)

Post by J Miller »

JReed wrote:Very nice
Can this be fixed on the Rugers also? I have noticed that they can be pretty bad when it comes to bolt rub.
Jeremy,

Ruger changed the latch timing on the New Model Single Actions so it would rise up sooner than it did with the Old Models. There is two ways to fix it that I am aware of.
First: Weld on more metal to the tail of the latch. Then fit it so the latch stays down till it will rise up in the cylinder lead.
Second: Make a longer hammer plunger. This does the same thing, but allows the use of the stock latch.


Griff, please forgive my hogging your thread. You just opened up a subject I've done quite a bit of research on, and I thought i could help.

Joe
***Be sneaky, get closer, bust the cap on him when you can put the ball where it counts ;) .***
User avatar
Griff
Posting leader...
Posts: 20883
Joined: Sat Mar 31, 2007 4:56 pm
Location: OH MY GAWD they installed a STOP light!!!

Post by Griff »

Joe,
Thanks for adding that very good description of the best loading method. Dead on for the OM Ruger, Colt or it's clones. Sounds reasonable on the NMs or the converted OMs. I've not handled any of those very much.

Anyone can easily check the timin' in their sixgun by the following method:

1 - check to MAKE SURE the gun is unloaded.
2 - holding the gun in your left hand, right side (loading gate) up, slowing pull the hammer from it's resting position to full cock. You will see the bolt fall and can see where it rises in relation to the rotation of the cylinder.
3 - it should make contact with the cylinder somewhere in the ramp.

Exactly where in the ramp it hits does have implications for the casual plinker or the speed-demon CAS shooter. I'll let someone more knowledgeable than I describe those. (I only THINK I understand it!) :lol:
Griff,
SASS/CMSA #93
NRA Patron
GUSA #93

There is a fine line between hobby & obsession!
AND... I'm over it!!
No I ain't ready, but let's do it anyway!
User avatar
Griff
Posting leader...
Posts: 20883
Joined: Sat Mar 31, 2007 4:56 pm
Location: OH MY GAWD they installed a STOP light!!!

Post by Griff »

J Miller wrote:Griff, please forgive my hogging your thread. You just opened up a subject I've done quite a bit of research on, and I thought i could help.
No problem, your post helped me understand the NM Ruger a little better. As a CAS RO, I'm sometimes called upon to clear a malfunction and when it's been a NM, I've usually punted to someone else. Take my larnin' where I can get it!
Griff,
SASS/CMSA #93
NRA Patron
GUSA #93

There is a fine line between hobby & obsession!
AND... I'm over it!!
No I ain't ready, but let's do it anyway!
User avatar
JReed
Advanced Levergunner
Posts: 5509
Joined: Tue Apr 03, 2007 11:17 am
Location: SoCal

Post by JReed »

I guess I will have to give Bob Munden a call he used to do a lot of work on Vaqueros. Griff is he still in business? I have been out of CAS for awhile so have lost track of a lot of people.
Jeremy
GySgt USMC Ret

To err is human, To forgive is devine, Neither of which is Marine Corps policy
Semper Fidelis
awp101
Advanced Levergunner
Posts: 5670
Joined: Mon Apr 09, 2007 7:13 pm
Location: DeeDee Snavely's Used Guns and Weapons

Post by awp101 »

JReed wrote:I guess I will have to give Bob Munden a call he used to do a lot of work on Vaqueros. Griff is he still in business? I have been out of CAS for awhile so have lost track of a lot of people.
I see his ads in SHOOT! or GotOW so I would imagine so...

And thanks for the info folks!
Nothing so needs reforming as other people's habits.
-Mark Twain

Proverbs 3:5; Philippians 4:13

Got to have a Jones for this
Jones for that
This running with the Joneses boy
Just ain't where it's at
User avatar
Griff
Posting leader...
Posts: 20883
Joined: Sat Mar 31, 2007 4:56 pm
Location: OH MY GAWD they installed a STOP light!!!

Post by Griff »

Last time I heard; yes: Bob Munden
Griff,
SASS/CMSA #93
NRA Patron
GUSA #93

There is a fine line between hobby & obsession!
AND... I'm over it!!
No I ain't ready, but let's do it anyway!
Nate Kiowa Jones
Site Sponsor
Posts: 2507
Joined: Fri Sep 07, 2007 12:05 pm
Location: Lampasas, Texas
Contact:

Post by Nate Kiowa Jones »

JReed wrote:I guess I will have to give Bob Munden a call he used to do a lot of work on Vaqueros. Griff is he still in business? I have been out of CAS for awhile so have lost track of a lot of people.
Hi Jeremy,
There is another feller Wes Flowers that is tops for Ruger work. His SASS aka is West Fargo. Wes even does a short stroke mod for the really fast CAS shooters. But as Joe has pointed out the early bolt rising ring around the cylinder can be cured with a longer plunger and Wes does that as well.
Here's his info;

http://cas-town.com/WestFargoGunsmith/index.html

Wes Flowers aka West Fargo
1792 W. Mount View Lane
Cochise, AZ 85606

1-520-826-0012
Steve Young aka Nate Kiowa Jones Sass# 6765

Steve's Guns aka "Rossi 92 Specialists"
205 Antler lane
Lampasas, Texas 76550


http://www.stevesgunz.com

Email; steve@stevesgunz.com

Tel: 512-564-1015

Image
User avatar
JReed
Advanced Levergunner
Posts: 5509
Joined: Tue Apr 03, 2007 11:17 am
Location: SoCal

Post by JReed »

Thanks for the links Gents.
Jeremy
GySgt USMC Ret

To err is human, To forgive is devine, Neither of which is Marine Corps policy
Semper Fidelis
User avatar
Andrew
Advanced Levergunner
Posts: 2043
Joined: Thu Sep 06, 2007 5:30 pm
Location: Southern Missouri

Post by Andrew »

Well Griff,

I checked mine and the stop pops up just right before the ramp. I mean, as close to it as it can get without being in it.

Why would it have a line all the way around?
ImageImage
Qui tacet consentit. (silence implies consent)
The Boring Blog
User avatar
KirkD
Desktop Artiste
Posts: 4406
Joined: Sat Apr 07, 2007 6:52 am
Location: Central Ontario, Canada
Contact:

Post by KirkD »

Griff, everything you say and show in your opening post, makes perfect sense to me. A couple months ago, I took apart one of my ancient sixguns (a S&W made in a 1873), specifically to look at the bolt, how it works and when it engages the cylinder. I could see at that time that it could easily be designed or tuned to rise to meet the ramp (provided the craftsman knows what he is doing) and then be pulled down before the hand engages. I do find it odd that modern sixgun manufacturers still produce guns where the bolt rises too soon to press against the cylinder long before the ramp comes round, resulting in a wear line right around the cylinder.
User avatar
J Miller
Member Emeritus
Posts: 14885
Joined: Sat Mar 31, 2007 7:46 pm
Location: Not in IL no more ... :)

Post by J Miller »

Andrew,

I'm not Griff, but I can answer your question. As I said above:
Old style single actions with includes most all the cap and ball revolvers, the Colt SAA and copies, and the Old Model Rugers will not ring the cylinder UNLESS one of two things happen. Mechanical wear or failure ~OR~ operator error or mishandling.
So let me elaborate. If you load your gun, or check it by pulling the hammer to half cock, spin the cylinder then lower the hammer down from half cock the cylinder will not be locked. The bolt (latch in Ruger lingo) will be resting against the cylinder and when the cylinder turns it will get ringed.
Any time the hammer is brought back to half cock, then lowered to rest without being brought to full cock first the bolt will drag on the cylinder.
Operator error.

If you watch a lot of old Hollyweird westerns you'll see this quite a bit. In Rio Lobo Dean Martin fakes reloading his Colt by doing this. John Wayne did it too quite a bit. And when you look close at these guns they are ringed.

I bought my OM BH in 97. Virtually new, no bluing wear around the firing pin or on the breach face. Almost no finish wear any place. But the cylinder was fully ringed. No excuse for it. There was nothing mechanically wrong with the pistol. Almost 3000 rounds ago I replaced the original cylinder with one with better chambers. At this point there is no ring on the new cylinder. I was taught before it was legal for me to own guns how to handle them by some real "been there done that" old guys. I miss them, I wish I could talk to them now.

Re read what I posted above with you gun in your hand and watch the bolt as Griff told you and you'll see what I'm saying.

Joe
***Be sneaky, get closer, bust the cap on him when you can put the ball where it counts ;) .***
User avatar
Griff
Posting leader...
Posts: 20883
Joined: Sat Mar 31, 2007 4:56 pm
Location: OH MY GAWD they installed a STOP light!!!

Post by Griff »

As I've said before, Nate is MUCH better qualified to answer but:

Andrew, I think that Joe has given a good example of how that line all the way can come about. Also, mechanical tolerances are such that some relationships change with speed.

Kirk, Nate's explanation of "stacking", I think he called it, can be pretty eye-opening in a number of industries. All parts are built with minimum and maximum dimensions. Hand fitting is required to keep operating tolerances to a minimum. And, we know hand fitting is expensive. So we end up with a cylinder diameter of x±.001" here and a frame height of y±.0001" there, a design gap of Z, a with a tolerance of another ±.0003", we now have a full blown recipe for ill-fitting parts with a gap of anywhere between Z+.0006" and .0022" instead of the design optimum of not more Z". THAT result, could in certain instances lead to either a tight or sloppy feel, poor function and utlimately, out amonst us in the finicky world of consumerism, dissatisfied customers. (Math ain't my strong suite!)
Griff,
SASS/CMSA #93
NRA Patron
GUSA #93

There is a fine line between hobby & obsession!
AND... I'm over it!!
No I ain't ready, but let's do it anyway!
JerryB
Advanced Levergunner
Posts: 5493
Joined: Mon Apr 02, 2007 9:23 pm
Location: Batesville,Arkansas

Post by JerryB »

Griff,thanks for the good post on this.I looked at my Colt and it does show a light wear line.I thought it was just age wear.The gun is a 1957 made SAA 5 1/2 inch .45 that I bought in 1959 with only 12 rounds through it. I lost it while hog hunting in the glades,it came out of my holster while my horse was having a fit. It laid in the slough for three months before we found it in early 1962. It was reblued and I thought that the line was just wear marks from the years of use but now figure that it must be since I started CAS back in September. Not real fast shooting but faster than usual. I took a couple of pictures but they had to much glare to show the line.
JerryB II Corinthians 3:17, Now the Lord is that Spirit: and where the Spirit of the Lord is, there is liberty.

JOSHUA 24:15
User avatar
Andrew
Advanced Levergunner
Posts: 2043
Joined: Thu Sep 06, 2007 5:30 pm
Location: Southern Missouri

Post by Andrew »

J Miller wrote: Any time the hammer is brought back to half cock, then lowered to rest without being brought to full cock first the bolt will drag on the cylinder.
Operator error.
Joe

Ok, that makes sense to me.

Hmmm, when I use the saftey notch I beleive there will be a mark left anyway, half way between locking notches.
ImageImage
Qui tacet consentit. (silence implies consent)
The Boring Blog
User avatar
Borregos
Advanced Levergunner
Posts: 4756
Joined: Thu Sep 13, 2007 7:40 am
Location: Ontario, Canada

Post by Borregos »

Interesting thread, I learned a lot, thanks for starting it Griff :D :D
Pete
Sometimes I wonder if it is worthwhile gnawing through the leather straps to get up in the morning..................
User avatar
Sixgun
Posting leader...
Posts: 18797
Joined: Sun Sep 16, 2007 7:17 pm
Location: S.E. Pa. Where The Finest Winchesters & Colts Reside

Post by Sixgun »

Griff,
Did Bob replace the internals in the clone? I am really impressed with the way it has held up through the many thousands. Sure shows the knowledge Bob has.
You would think that the amount Colt charges for a SA, that they would be properly timed. A couple I have are, but most are not. Then again I think Colt plans on only about 10% of their guns getting shot. ----------------------Sixgun
Yes, It’s Mighty, No Need To Prove It…..
Image
User avatar
J Miller
Member Emeritus
Posts: 14885
Joined: Sat Mar 31, 2007 7:46 pm
Location: Not in IL no more ... :)

Post by J Miller »

Andrew wrote:
J Miller wrote: Any time the hammer is brought back to half cock, then lowered to rest without being brought to full cock first the bolt will drag on the cylinder.
Operator error.
Joe

Ok, that makes sense to me.

Hmmm, when I use the saftey notch I beleive there will be a mark left anyway, half way between locking notches.
Andrew, if you pull the hammer back to the safety (first notch) the hammer hasn't moved far enough to start turning the cylinder, and the bolt is still locked in. You can put an old style SA on the safety notch and then put the hammer to rest without creating any wear.
The problem starts after the hammer gets to the half cock position and is then lowered.

Joe
***Be sneaky, get closer, bust the cap on him when you can put the ball where it counts ;) .***
User avatar
Griff
Posting leader...
Posts: 20883
Joined: Sat Mar 31, 2007 4:56 pm
Location: OH MY GAWD they installed a STOP light!!!

Post by Griff »

Sixgun wrote:Griff,
Did Bob replace the internals in the clone? I am really impressed with the way it has held up through the many thousands. Sure shows the knowledge Bob has.
You would think that the amount Colt charges for a SA, that they would be properly timed. A couple I have are, but most are not. Then again I think Colt plans on only about 10% of their guns getting shot. ----------------------Sixgun
Bob replaced the bolt with a Colt part, the mainspring with his own, and the trigger/bolt spring with his wire version. His mainspring broke a couple of years later. I bought a Colt one and shaped to match the one he installed with a little more metal left, radiused all the corners where I'd ground it, then polished it all the way around. It's still running good. I had it out when I took the pictures and inspected the spring... couldn't find anything wrong, guess it'll break when it breaks.

And you're probably right about Colt.
Griff,
SASS/CMSA #93
NRA Patron
GUSA #93

There is a fine line between hobby & obsession!
AND... I'm over it!!
No I ain't ready, but let's do it anyway!
User avatar
Mike D.
***Rock Star***
Posts: 4234
Joined: Sun Apr 01, 2007 4:56 pm
Location: Northern CA

Post by Mike D. »

This is what happens after 105 years of hard use. Cylinder drag marks kinda get wiped out on the old beaters. Of course, so does the rest of the finish.:)
Image
"Congressmen who willfully take actions during wartime that damage morale, and undermine the military are saboteurs and should be arrested, exiled or hanged"....President Abraham Lincoln
User avatar
Sixgun
Posting leader...
Posts: 18797
Joined: Sun Sep 16, 2007 7:17 pm
Location: S.E. Pa. Where The Finest Winchesters & Colts Reside

Post by Sixgun »

Mike D. wrote:This is what happens after 105 years of hard use. Cylinder drag marks kinda get wiped out on the old beaters. Of course, so does the rest of the finish.:)
Mike, When I see an old Colt like that, I melt. Please don't condensend on that fine Colt of yours. :D Beaters only describe ghetto guns :D -----------------Sixgun
Yes, It’s Mighty, No Need To Prove It…..
Image
User avatar
Andrew
Advanced Levergunner
Posts: 2043
Joined: Thu Sep 06, 2007 5:30 pm
Location: Southern Missouri

Post by Andrew »

Well Joe I phrased that poorly. There is a recesed notch between all the nipples that the hammer can be let down into to keep it safe while carrying.

I read the manual's directions and followed them to a "T" and it produced no dragging that I could see.

The manual said:

TO 'UNCOCK (DECOCK) THE REVOLVER

If the revolver is cocked, and you wish to let the hammer down to one of the safety recesses in the cylinder, proceed as follows:

Place your right thumb firmly on the hammer spur and, with your thumb securely in control of the hammer, squeeze the trigger only enough to permit the hammer to 'break free' of the trigger. At that instant, IMMEDIATELY RELEASE THE TRIGGER and then slowly permit the hammer, STILL SECURE UNDER YOUR THUMB, move into the load notch position. Repeating this procedure, slowly allow the hammer to move forward about 1/2 the distance from the load notch to the frame. Then, pull the hammer back to the load notch position and rotate the cylinder so that a safety recess in the rear of the cylinder is in line with the hammer. Now, carefully depress the trigger and ease the hammer nose down into one of the safety recesses in the cylinder. NOTE: It is imperative that the finger pressure be removed from the trigger just as soon as it is free of the hammer. Then, properly, the trigger and hammer will move towards their forward rest positions together.


A pic to show the recesses...
Image
ImageImage
Qui tacet consentit. (silence implies consent)
The Boring Blog
User avatar
J Miller
Member Emeritus
Posts: 14885
Joined: Sat Mar 31, 2007 7:46 pm
Location: Not in IL no more ... :)

Post by J Miller »

Andrew,

I just reread this thread and I still missed the fact you were talking about the Ruger Old Army. I know understand your question about the notch. Not being familiar with the Old Army I didn't know it was set up like that.

Nice pic, it shows a bunch of details.

From your quote of the owners manual this revolver has a different manual of arms than the cartridge versions.
I just learned something.


Joe
***Be sneaky, get closer, bust the cap on him when you can put the ball where it counts ;) .***
User avatar
Griff
Posting leader...
Posts: 20883
Joined: Sat Mar 31, 2007 4:56 pm
Location: OH MY GAWD they installed a STOP light!!!

Post by Griff »

Andrew wrote:...Place your right thumb firmly on the hammer spur and, with your thumb securely in control of the hammer, squeeze the trigger only enough to permit the hammer to 'break free' of the trigger. At that instant, IMMEDIATELY RELEASE THE TRIGGER and then slowly permit the hammer, STILL SECURE UNDER YOUR THUMB, move into the load notch position. Repeating this procedure, slowly allow the hammer to move forward about 1/2 the distance from the load notch to the frame. Then, pull the hammer back to the load notch position and rotate the cylinder so that a safety recess in the rear of the cylinder is in line with the hammer. Now, carefully depress the trigger and ease the hammer nose down into one of the safety recesses in the cylinder. NOTE: It is imperative that the finger pressure be removed from the trigger just as soon as it is free of the hammer. Then, properly, the trigger and hammer will move towards their forward rest positions together.
That description of the steps to place the hammer in one of the "safety" notches, follows a slight variation of the steps Joe decribed. Although the bolt will rise, you're not rotating the cylinder until the hammer is pulled back to the loading notch. When you next pull the hammer in preparation for firing the bolt will fall away from the cylinder before the hand starts to rotate it... if I'm reading that correctly.
Griff,
SASS/CMSA #93
NRA Patron
GUSA #93

There is a fine line between hobby & obsession!
AND... I'm over it!!
No I ain't ready, but let's do it anyway!
User avatar
Andrew
Advanced Levergunner
Posts: 2043
Joined: Thu Sep 06, 2007 5:30 pm
Location: Southern Missouri

Post by Andrew »

Griff wrote: When you next pull the hammer in preparation for firing the bolt will fall away from the cylinder before the hand starts to rotate it... if I'm reading that correctly.
Yep, I watched it a bunch of times sitting here at the computer. When you go back with it, the bolt drops and you got to eyeball the halfway point between holes. I make the nipples split the top of the frame, that works good for me.

The best part is that putting it there is alot harder than getting it back. Getting it back just consists of cranking on the hammer, then it's ready to rock. :D
ImageImage
Qui tacet consentit. (silence implies consent)
The Boring Blog
Post Reply