Holster tutorial, Part 2

Welcome to the Leverguns.Com Forum. This is a high-class place so act respectable. We discuss most anything here ... politely.

Moderators: AmBraCol, Hobie

Forum rules
Welcome to the Leverguns.Com General Discussions Forum. This is a high-class place so act respectable. We discuss most anything here other than politics... politely.

Please post political post in the new Politics forum.
Post Reply
User avatar
kimwcook
Advanced Levergunner
Posts: 7978
Joined: Tue Sep 04, 2007 10:01 pm
Location: Soap Lake, WA., U.S.A.

Holster tutorial, Part 2

Post by kimwcook »

After tracing your pattern onto the leather comes the cutout. I use a linoleum knife with a new blade. You need to make one single continuous cut on any straight lines. Obviously at the corners you stop and start cutting the other way. But when you start your next pass it should be one long cut. It's important the blade remains straight up and down. Be very careful, the blades awful sharp and you'll be pushing pretty hard to cut the leather in one pass. The short radius' will be the hardest just be careful and tip the blade up more so the tip is doing most of the cutting.
Image

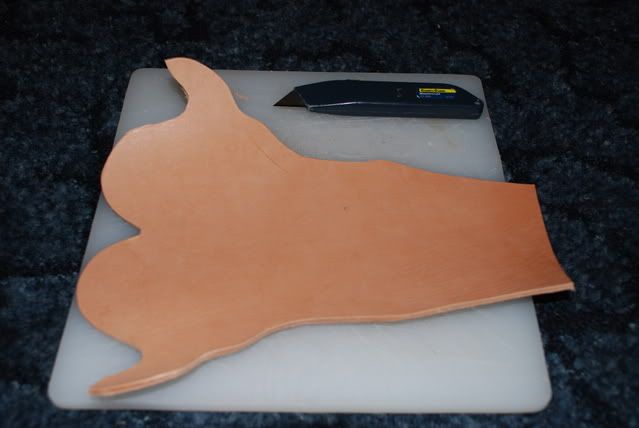
This is the pattern cut out and laying on the self healing cutting board I use. I'd prefer a bigger one but this one works.
Image

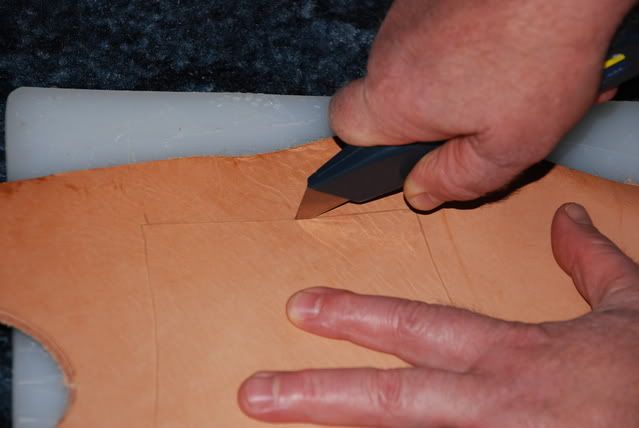
Next, using a groover, this one's adjustable, slowly cut a groove around the outer edge of your pattern. This is used for setting your thread below surface level so it doesn't prematurely wear and break. Go slow as it's real easy to mess this up.
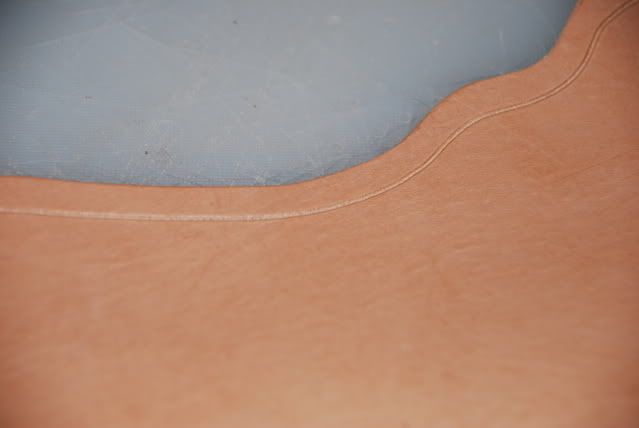
Image

A closer shot.
Image

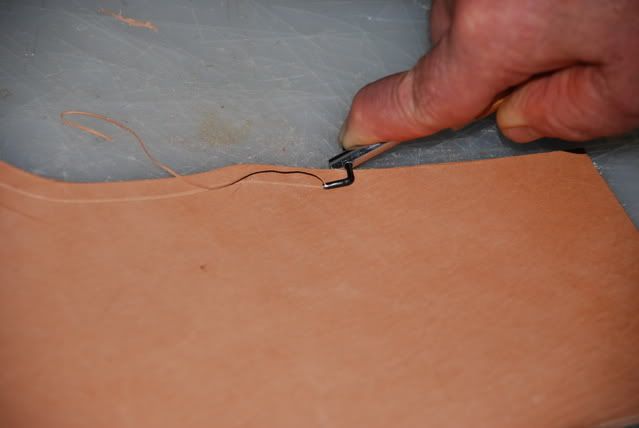
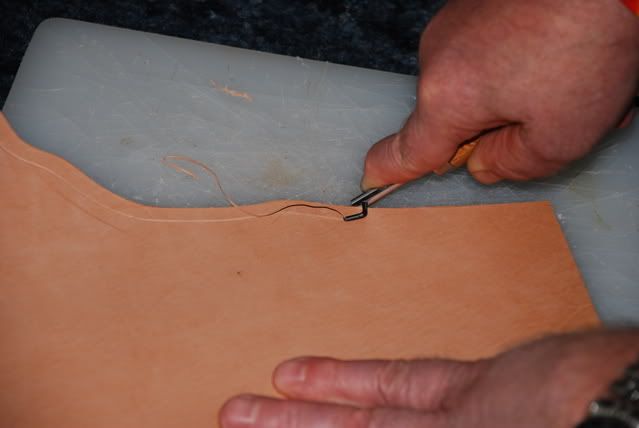
Here's the groove. I do this with the leather dry as it doesn't tend to bunch up through the small hole that makes the cut.
Image

Then I "case" the leather with hot water and let it soak for a few minutes, making sure it's good and wet. I pick a pattern I want to use around the border and stamp it out.
Image

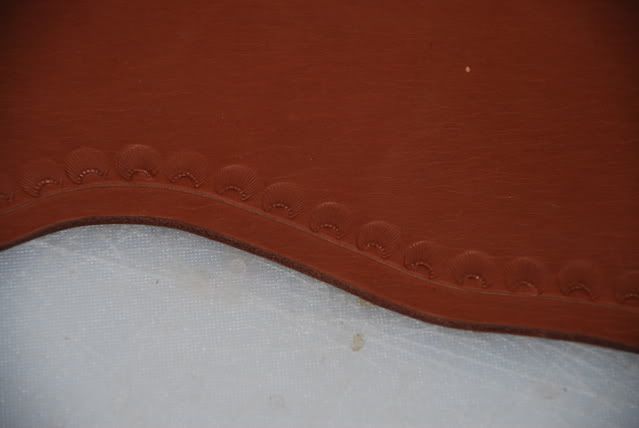
Another shot of the stamping.
Image

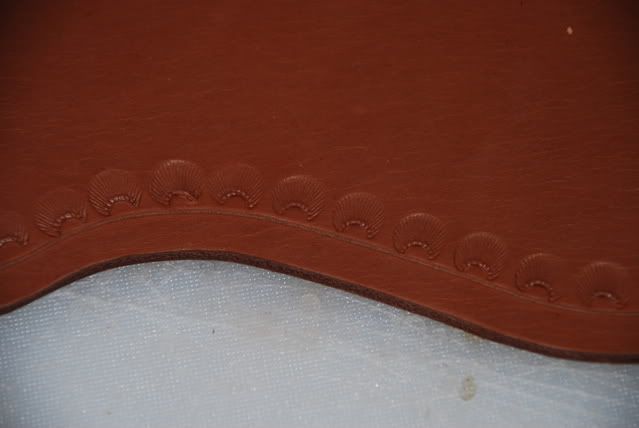
Now I've got to let the leather dry before I can do anything else with it as I'm done with my simple border tooling. That's all I want for this piece.

Hopefully tomorrow I'll get a bit further. I apologize for the slow process.
Old Law Dawg
awp101
Advanced Levergunner
Posts: 5670
Joined: Mon Apr 09, 2007 7:13 pm
Location: DeeDee Snavely's Used Guns and Weapons

Re: Holster tutorial, Part 2

Post by awp101 »

No need to apologize, you're accomplishing more than I am!
Nothing so needs reforming as other people's habits.
-Mark Twain

Proverbs 3:5; Philippians 4:13

Got to have a Jones for this
Jones for that
This running with the Joneses boy
Just ain't where it's at
User avatar
kimwcook
Advanced Levergunner
Posts: 7978
Joined: Tue Sep 04, 2007 10:01 pm
Location: Soap Lake, WA., U.S.A.

Re: Holster tutorial, Part 2

Post by kimwcook »

The last stamping pictures show why it's so important to try and keep your knife blade straight up and down. It keeps the edge very parallel.
Old Law Dawg
salvo
Senior Levergunner
Posts: 1509
Joined: Mon Sep 03, 2007 3:56 pm
Location: Vegas
Contact:

Re: Holster tutorial, Part 2

Post by salvo »

Great work! Anxiously waiting for part 3 :D
ScottS

Image

"No arsenal, no weapon in the arsenals of the world, is so formidable as the will and moral courage of free men and women."
-- Ronald Reagan
User avatar
Andrew
Advanced Levergunner
Posts: 2043
Joined: Thu Sep 06, 2007 5:30 pm
Location: Southern Missouri

Re: Holster tutorial, Part 2

Post by Andrew »

awp101 wrote:No need to apologize, you're accomplishing more than I am!
Ha, me too. :D Neat posts and I'm lookin' forward to the next one.
ImageImage
Qui tacet consentit. (silence implies consent)
The Boring Blog
User avatar
Borregos
Advanced Levergunner
Posts: 4756
Joined: Thu Sep 13, 2007 7:40 am
Location: Ontario, Canada

Re: Holster tutorial, Part 2

Post by Borregos »

I am enjoying these posts, it is unlikely I will ever do it but it is extremely interesting and has already answered a number of questions I always had in my mind about holster making.
Thanks for taking the trouble to post this series :D
Pete
Sometimes I wonder if it is worthwhile gnawing through the leather straps to get up in the morning..................
User avatar
RIHMFIRE
Advanced Levergunner
Posts: 7660
Joined: Fri Sep 07, 2007 11:51 am
Location: Florida

Re: Holster tutorial, Part 2

Post by RIHMFIRE »

that looks like a great hobby!
cant wait to see the rest of the process...
where did you get the border stampsand the
rest of the tools?
LETS GO SHOOT'N BOYS
Pete44ru
Advanced Levergunner
Posts: 11242
Joined: Sun Sep 02, 2007 7:26 am

Re: Holster tutorial, Part 2

Post by Pete44ru »

Leatherworking tools & supplies, including leather, can be had from Tandy - either at a local store or online:

http://74.125.95.132/search?q=cache:eb9 ... cd=1&gl=us

http://www.tandyleatherfactory.com/prod ... p?Dept=425

.
Naphtali
Levergunner 2.0
Posts: 445
Joined: Sun Apr 27, 2008 2:21 pm
Location: Montana

Re: Holster tutorial, Part 2

Post by Naphtali »

How do you create the pattern and leather for reinforcing the seam? I'm not describing this well so I'll try again. I have a schlock pouch sheath for a knife where the pouch is created, as you are doing, by folding the leather and sewing it together at the fold. I have a good pouch sheath, holsters also, where there is a small strip of leather -- say about 1/4 inch wide?? -- between the folded pouch/holster. Pouch and strip are sewn together to create a single seam. Strips purpose appears to be to protect stitching from wear. I think I asked what I really wanted to ask. So how do you do this?
It's so simple to be wise. Just think of something stupid to say and then don't say it. Sam Levinson
rjohns94
Advanced Levergunner
Posts: 10820
Joined: Thu Sep 06, 2007 6:02 pm
Location: York, PA

Re: Holster tutorial, Part 2

Post by rjohns94 »

very kewl
Mike Johnson,

"Only those who will risk going too far, can possibly find out how far one can go." T.S. Eliot
User avatar
bsaride
Senior Levergunner
Posts: 1268
Joined: Fri Sep 07, 2007 7:19 pm
Location: North Carolina

Re: Holster tutorial, Part 2

Post by bsaride »

Naphtali wrote:How do you create the pattern and leather for reinforcing the seam? I'm not describing this well so I'll try again. I have a schlock pouch sheath for a knife where the pouch is created, as you are doing, by folding the leather and sewing it together at the fold. I have a good pouch sheath, holsters also, where there is a small strip of leather -- say about 1/4 inch wide?? -- between the folded pouch/holster. Pouch and strip are sewn together to create a single seam. Strips purpose appears to be to protect stitching from wear. I think I asked what I really wanted to ask. So how do you do this?
Just trace the outside of your pattern and then draw a parallel line on the inside. I like to use Barg cement to hold
it in place.

I also case my leather using warm water and keep it under the water until no more bubbles. Sometimes you will need
to wait to let it dry just a little for the stamping part.
KI6WZU
NRA member
Image
"When they call the roll in the Senate, the Senators do not know whether to answer 'present' or 'not guilty.'"
--President Theodore Roosevelt (1858-1919)

“Democracy must be something more than two wolves and a sheep voting on what to have for dinner”
User avatar
marlinman93
Advanced Levergunner
Posts: 6513
Joined: Sun Apr 01, 2007 3:40 pm
Location: Oregon

Re: Holster tutorial, Part 2

Post by marlinman93 »

Great tutorials! I built a holster years ago, but now you have me thinking I need to do one again soon!
Pre WWI Marlins and Singleshot rifles!
http://members.tripod.com/~OregonArmsCollectors/
User avatar
Rimfire McNutjob
Advanced Levergunner
Posts: 3171
Joined: Mon Sep 03, 2007 2:51 pm
Location: Sanford, FL.

Re: Holster tutorial, Part 2

Post by Rimfire McNutjob »

kimwcook wrote:I apologize for the slow process.
Yeah, slow down man. I need to run get some popcorn. :wink:
... I love poetry, long walks on the beach, and poking dead things with a stick.
Pete44ru
Advanced Levergunner
Posts: 11242
Joined: Sun Sep 02, 2007 7:26 am

Re: Holster tutorial, Part 2

Post by Pete44ru »

[I have a good pouch sheath, holsters also, where there is a small strip of leather -- say about 1/4 inch wide?? -- between the folded pouch/holster. Pouch and strip are sewn together to create a single seam. Strips purpose appears to be to protect stitching from wear.]

Nope - What protects the stitching from wear is recessing it in the cut groove, parallel to the holster/sheath edge.

The strip of leather, between the sewn edges of the holster, are to space the front and back panel a tad further apart, so the leather doesn't bend so much when formed around the gun/knife - and also for better rivet support, often used at or near the end of a line of stitching.

.
Naphtali
Levergunner 2.0
Posts: 445
Joined: Sun Apr 27, 2008 2:21 pm
Location: Montana

Re: Holster tutorial, Part 2

Post by Naphtali »

Pete44ru wrote:[I have a good pouch sheath, holsters also, where there is a small strip of leather -- say about 1/4 inch wide?? -- between the folded pouch/holster. Pouch and strip are sewn together to create a single seam. Strips purpose appears to be to protect stitching from wear.]

Nope - What protects the stitching from wear is recessing it in the cut groove, parallel to the holster/sheath edge. . . .
I don't understand the phrase "cut groove." Please explain it for me. Among things I'm trying to learn from this multiple-part tutorial is whether anything can be done to render the schlock sheaths into decent ones. The other thing is to get a handle on what my next two holsters will require mechanically to do the job I want them to do.

Those schlock sheaths have some excellent features I insisted upon having. But I knew nothing about basic sheath design. I assumed the sheath maker had this knowledge -- silly me.
It's so simple to be wise. Just think of something stupid to say and then don't say it. Sam Levinson
User avatar
kimwcook
Advanced Levergunner
Posts: 7978
Joined: Tue Sep 04, 2007 10:01 pm
Location: Soap Lake, WA., U.S.A.

Re: Holster tutorial, Part 2

Post by kimwcook »

Naphtali, to cut the grove one needs a groove cutter. In the picture I have showing me cutting the groove I know it doesn't show it very well. But, it's a piece of rod stuck into a wooden handle. In the end of the rod there's a small hole drilled that actually holds the tool that cuts. It's adjustable so you can place the groove closer or further from the edge. The tool is a small rod that has a hole drilled in it and the end of the rod on the cutting side has a small bevel. The hole has it drags along the leather cuts a small string of leather. I go over my grooves a couple of times so as to even it out and deepen it. I'll try to show a pic of it in the next installment.

By the way, ask any questions you have. It appears we've got enough people here that have done this to answer your questions. If it doesn't get answered, I'll find the answer because I need to know it too.
Old Law Dawg
Woodtroll
Levergunner 2.0
Posts: 196
Joined: Tue Apr 03, 2007 1:04 pm
Location: Mtns of SW VA

Re: Holster tutorial, Part 2

Post by Woodtroll »

Naphtali,

What you were originally describing is a gusset, a seperate small strip of leather that can indeed keep a fixed-blade knife or axe from cutting the stitching from the inside. Other purposes have already been described here. The gusset is just cut to the same outline of the side of the holster that it is used on, and 1/4-3/8" deep. Some fixed-blade sheaths, particularly for the thicker and heavier blades, are made in three pieces and stitched all the way around. The "gusset" there is just a piece of leather cut identical to the top/ front piece, but with the outline of the knife blade cut out from the middle of it. Then, the gusset is sandwiched in the middle, glued and stitched in, to help create the void space.

Hope this helps. Y'all take care!
Regan
Running the ridges and rivers of Virginia's southern Appalachians
User avatar
Buck Elliott
Member Emeritus
Posts: 2830
Joined: Mon Sep 10, 2007 12:15 pm
Location: Halfway up Sheep Mountain -- Cody, Wyoming

Re: Holster tutorial, Part 2

Post by Buck Elliott »

Not really a gusset, but a 'filler' or a 'welt' to strengthen the seam.

BTW, whatever you CUT with had better be SHARP!... Most utility knives just don't cut it -- literally! I use a good head (round-) knife along with a few woodcarvers knives for the tight stuff and cut my small (up to 1 1/4" dia.) inside curves with an appropriate drive punch.

Been buildin' leather for over 45 years... :)
Regards

Buck

Life has a way of making the foreseeable that which never happens, and the unforeseeable, that which your life becomes...
User avatar
Buck Elliott
Member Emeritus
Posts: 2830
Joined: Mon Sep 10, 2007 12:15 pm
Location: Halfway up Sheep Mountain -- Cody, Wyoming

Re: Holster tutorial, Part 2

Post by Buck Elliott »

BTT
Regards

Buck

Life has a way of making the foreseeable that which never happens, and the unforeseeable, that which your life becomes...
Pete44ru
Advanced Levergunner
Posts: 11242
Joined: Sun Sep 02, 2007 7:26 am

Re: Holster tutorial, Part 2

Post by Pete44ru »

I bought a large box of 100 or so single-edge razor blades at a builder's supply outlet (Lowe's, Home Cheapo, etc) for use only as a leather-cutting knife that's tossed as it dulls, for a new one.

The blades have a re-inforced spine, that's easy to grasp with the fingers as it's drawn down the marked-out cut-line.

.
User avatar
kimwcook
Advanced Levergunner
Posts: 7978
Joined: Tue Sep 04, 2007 10:01 pm
Location: Soap Lake, WA., U.S.A.

Re: Holster tutorial, Part 2

Post by kimwcook »

I agree that learning to use a round knife is the traditional way to go and possibly the best. I've just never done enough leather work or been around someone to teach me the correct way to do it. Like most everything else I've done in life I'll probably have to teach myself. Or, find someone, don't know where around my country, willing to teach a monkey.
Old Law Dawg
awp101
Advanced Levergunner
Posts: 5670
Joined: Mon Apr 09, 2007 7:13 pm
Location: DeeDee Snavely's Used Guns and Weapons

Re: Holster tutorial, Part 2

Post by awp101 »

Bump! :mrgreen:
Nothing so needs reforming as other people's habits.
-Mark Twain

Proverbs 3:5; Philippians 4:13

Got to have a Jones for this
Jones for that
This running with the Joneses boy
Just ain't where it's at
Post Reply