Reloading bench design help needed

Welcome to the Leverguns.Com Forum. This is a high-class place so act respectable. We discuss most anything here ... politely.

Moderators: AmBraCol, Hobie

Forum rules
Welcome to the Leverguns.Com General Discussions Forum. This is a high-class place so act respectable. We discuss most anything here other than politics... politely.

Please post political post in the new Politics forum.
Post Reply
alnitak
Senior Levergunner
Posts: 1775
Joined: Tue Sep 04, 2007 7:13 am
Location: Virginia

Reloading bench design help needed

Post by alnitak »

Looking at all the great pictures of y'all's reloading benches has gotten me inspired. A couple years back, I had a small deck built in my garage (10'x12'), put in some cabinets and shelf space along the sides, and a pegboard half-wall at the far end. I had intended to put a workbench under the pegboard, something that could double as a reloading bench, a fly-tying bench and a tinkering area for other projects. I'm currently toying with the design and need some input.

Let me say that my building skills are elementary. I'm envisioning a frame of 2x4s and 2x3s, bolted or screwed together, with some 1x's cut and laid on top for a shelf or two on each side, and for the top working surface. I have a number of questions, from a practical nature, that could use your insight and experience -- what has worked for you that I can incorporate into my (simple) design. My max available room is 5'-6' wide and 32" deep. I was initially thinking something like 4.5'-5' wide by 18"-20" deep.

As an example, for reloading specifically, will 1x's be strong enough for a single stage press, or do I need a more robust benchtop on which to bolt the press? How deep is a good working workbench? How high? Should I use a stool (I see most do) or a chair (maybe better for flytying??)? If a stool, do I need to allow for knee room if I build a shelf in the center? Should I consider a flat "U" shape (e.g., with the sides of the U extending out to 32" and the base extending to 20") for the bench rather than just rectangular (maybe easier on the knees if the press is on one of the wings?)?

I really like YK's idea with the interchangeable plate for the press and other mounted tools. It also has the advantage of being able to remove the press and make the benchtop flat again if the room is needed for another project. Frankly, though, I don't know if my carpentry skills are up to the task of replicating that design.

So, what good ideas and designs should I consider, both from a reloading perspective and given the multi-purpose of the bench? What real-world experience should I take into account (e.g., "I've always found that I need at least 24" clear above the workbench; so, don't build shelves too low above it." Any advice would be appreciated...as would any plans and material lists some of you obsessive types may have created. :D
"From birth 'til death...we travel between the eternities." -- Print Ritter in Broken Trail
User avatar
mikld
Advanced Levergunner
Posts: 2336
Joined: Sat Dec 15, 2007 12:46 pm
Location: So. Orygun!

Re: Reloading bench design help needed

Post by mikld »

Mike
Vocatus atque non vocatus, Deus aderit...
I've learned how to stand on my own two knees...
User avatar
bsaride
Senior Levergunner
Posts: 1268
Joined: Fri Sep 07, 2007 7:19 pm
Location: North Carolina

Re: Reloading bench design help needed

Post by bsaride »

I recently bought a Sears bench. Don't bother with it for loading as it's kinda flimsy.
I would like to see more depth to a bench because you will be putting all kinds of stuff
on it (cases, primers, bullets, powder keg. tools, dies, etc.). I don't remember were I
saw it but RCBS or someone makes a plate the you can bolt down that is tapped for
a bunch of different reloading gear. Big heavy solid bench is what you need.
KI6WZU
NRA member
Image
"When they call the roll in the Senate, the Senators do not know whether to answer 'present' or 'not guilty.'"
--President Theodore Roosevelt (1858-1919)

“Democracy must be something more than two wolves and a sheep voting on what to have for dinner”
Kansas Ed
Senior Levergunner
Posts: 1261
Joined: Tue Sep 18, 2007 8:08 pm
Location: Wichita

Re: Reloading bench design help needed

Post by Kansas Ed »

If you're going to use standard lumber for your worktop you can go a couple of ways. Use 1 by's for the top and cover with 3/4" finish plywood (my preference), or just use 2 by's. I suppose you could also layer 2 layers of the plywood together and screw it together using a construction adhesive between the two. Either way IMO you need to cut a metal plate to support the bottom of the wood under the press to keep it from flexing, as just nuts and fender washers will eventually take their toll on the wood. Using a metal plate cut just over the size of the press bolt pattern will spread the load out over a greater area and keep things strong for a lot of years. I used some 1/4" steel plate I had laying around and drilled it to the bolt pattern of the press. Be sure to cover it with a thick layer of Polyurethane finish...makes it much easier to clean off that way and it won't get nasty stains in it.

In Wy I used old kitchen base cabinets which worked out great...if you can find someone who's installing new cabinets and ditching their old ones. Here in KS I revamped a small closet into a loading area using the plywood/wood method. It's a stronger setup, but not as convienent as having the base cabinet storage. If you ask around at a local carpet/cabinetry store, they might give you some pulled out old cabinets from a remodel job much cheaper than you could buy the materials to make your setup...complete with a section of the old countertop to work off of. They normally take them to a dump anyway.

Ed
User avatar
AJMD429
Posting leader...
Posts: 32294
Joined: Sun Sep 09, 2007 10:03 am
Location: Hoosierland
Contact:

Re: Reloading bench design help needed

Post by AJMD429 »

Kansas ([i]then [u]Wyoming[/u] Ed, according to his post[/i]) Ed wrote:In Wy I used old kitchen base cabinets which worked out great...if you can find someone who's installing new cabinets and ditching their old ones.
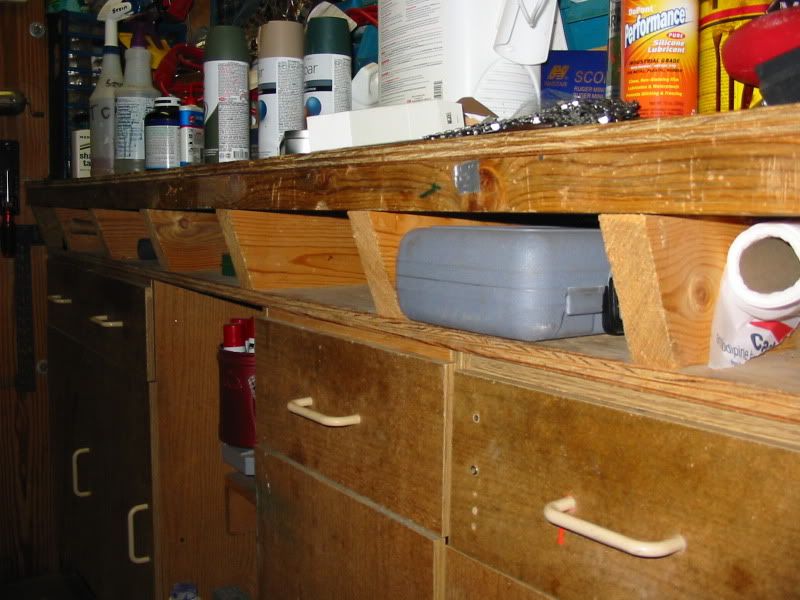
Here's what we did with some cheap/old cabinets. You'll want a higher work surface if you stand or use a stool, plus you'll want to be closer to the countertop with some allowance for knee-room if using a stool. Also, it is nice to have a top you can easily clamp things to, and easily store things under that don't need to go in drawers or cabinets.

I just placed the cabinets, put a piece of 1/2" or 3/4" plywood on top and cut it to size, then before fastening it down, built this 2x6" frame on it as shown. I angled the fronts of the beams to jut the counter out a couple inches. To make the front edge stronger, I notched the tops/ends of the 2x6 'joists' and made it just wide enough to lay a 2x6 in that notch so the 1-1/2" edge is in front. Then I laid 3/4" plywood on the top of it all.

Very sturdy and can mount equipment easily, vices, reloading presses, etc.

I've since made another and moved my reloading stuff to it, but didn't have pics of it.

I think YK and others have posted photos of their 'inlays' they use for press mounting, and you could do that with a bench like mine; the 2x6 front would give extra support, and you'd just have to make sure it had any and all the holes you needed for each insert.

Image
Last edited by AJMD429 on Thu Oct 22, 2009 1:09 pm, edited 1 time in total.
Doctors for Sensible Gun Laws
"first do no harm" - gun control LAWS lead to far more deaths than 'easy access' ever could.


Want REAL change? . . . . . "Boortz/Nugent in 2012 . . . ! "
adirondakjack
Senior Levergunner
Posts: 1925
Joined: Mon Dec 17, 2007 7:09 pm
Location: Upstate NY
Contact:

Re: Reloading bench design help needed

Post by adirondakjack »

My bench is SOLID, but it's only framed with 2X3s and the top is a long prefinished shelf I think 16" wide that I cut in half and doubled, srewed together with a bunch of drywall screws pre-drilled and countersunk (that shelf stuff doesn't compress like wood).. This means the top is 1 1/2" thick. BOLT the press and use fender washers on the bottom. Now, besure you screw the bench frame solidly to the floor and wall so it is like a rock. If ya have a decent power screwdriver, use the 3" deck screws that are driven with a square bit to connect framing. They work. Keep it all rigid, make sure ya have angle braces on the sides, connecting the front and rear legs, etc. That way when ya crank the press handle, NOTHING moves, giving ya a very solid feel for what the press is doing. Oh, FWIW I'd build a bench only 3' wide and use the remaining area for yer work bench. Keep em separate, maybe make the loading bench sit down height (lower is better, just enough to get yer knees under), and the work bench taller??? Separate benches means ya won't have "stuff" migrating into the reloading zone as easy.

Oh, one little tidbit. Arrange a small, eye-level shelf not connected to the bench in any way for your scale. Make sure it is dead level. Keeping it segregated means it is free of vibration, you can see what it;s doing, and there's no clutter around it.
Certified gun nut
Gun Smith
Levergunner 3.0
Posts: 975
Joined: Fri Sep 14, 2007 10:24 am

Re: Reloading bench design help needed

Post by Gun Smith »

I found and old auto test machine/scope at an auction. I got it for $20.00. I threw the scope and all the test cables, etc. away. The base was a beautiful all steel cabinet. I simply mounted my presses on the steel top. It had $40.00 worth of locking caster wheels on the bottom. I can roll it out of the way when I am not reloading. I store my lead shot and bullets in it, and that makes it very steady for all my reloading needs.
RKrodle
Senior Levergunner
Posts: 1960
Joined: Sun Sep 09, 2007 7:14 pm
Location: Texas

Re: Reloading bench design help needed

Post by RKrodle »

Remember that a work bench is like a gun safe, never big enough. I like a solid top and I use 3/4 plywood for it and reinforce the bottom, where the press will be, with 2X4's. I also like a tall bench so I can either stand or sit on a stool.
Ricky

DWWC
Ray Newman
Advanced Levergunner
Posts: 2056
Joined: Mon Dec 10, 2007 12:43 pm
Location: Between No Where & No Place, WA

Re: Reloading bench design help needed

Post by Ray Newman »

For those that want to build their own, a very stout bench & upper cabinet design from the National Reloading Manufacturers Association:

http://www.shotgunsportsmagazine.com/do ... _plans.pdf

It may load slow.
The most important aspect of this signature line is that you don't realize it doesn't say anything significant until you are just about done reading it & then it is too late to stop reading it....
Grand Poo Bah WA F.E.S.

In real life may you be the bad butt that you claim to be on social media.
Kansas Ed
Senior Levergunner
Posts: 1261
Joined: Tue Sep 18, 2007 8:08 pm
Location: Wichita

Re: Reloading bench design help needed

Post by Kansas Ed »

adirondakjack wrote:
Oh, one little tidbit. Arrange a small, eye-level shelf not connected to the bench in any way for your scale. Make sure it is dead level. Keeping it segregated means it is free of vibration, you can see what it;s doing, and there's no clutter around it.
That is a fantastic idea!

Ed
User avatar
deerwhacker444
Senior Levergunner
Posts: 1300
Joined: Wed Sep 12, 2007 1:12 pm
Location: Oklahoma

Re: Reloading bench design help needed

Post by deerwhacker444 »

I built a bench using "2x4 Basics" leg kits. All you do is cut 2x4's to length and screw everything together, can't get much simpler than that.

2x4 Basics Home Page

2X4 Basics @ Northern Tool

I made mine 2'x4', that way I could use precut plywood for a top since I didn't have any tools at the time and lived in an apartment. With this kit, you can make a table as big or as small as you like.
"If ever a time should come, when vain and aspiring men
shall possess the highest seats in Government,
our country will stand in need of its experienced patriots
to prevent its ruin
." Samuel Adams
User avatar
Ysabel Kid
Moderator
Posts: 27918
Joined: Mon Sep 17, 2007 7:10 pm
Location: South Carolina, USA
Contact:

Re: Reloading bench design help needed

Post by Ysabel Kid »

Bruce -

I built my first workbench, using the same 2x4 construction, 25 years ago using a circular saw, power drill, and hammer. Really basic tools and very simple - yet very sturdy construction.

Go with 2x4's. This will give the bench all the strength it needs. As far as height, the way I built mine was to stand and measure the height to where my hands where when my arms were bent to form a 90-degree angle. This means you can work at the bench without stooping, reaching down, or reaching up. It is a natural work height and very ergonomical.

Plan for an overhang for the bench - I did not do mine large enough and it one thing I would correct. This will allow you to sit at the bench on a stool (with back support) and comfortably reload.

Good luck!
Image
Wind
Levergunner 2.0
Posts: 474
Joined: Fri Dec 26, 2008 1:10 pm
Location: North Central Washington, USA

Re: Reloading bench design help needed

Post by Wind »

Hey there Alnitak –

Trying to describe how to build your bench would be like trying to answer the question “How big is a dog”. I would be willing to pitch in some suggestions.

I’ll throw in some pictures of mine to maybe help illustrate what I’m talking about. I have been using this bench for thirty years and it started early on living in a very small apartment.

My top is 30 inches by 48 inches. It’s laminated out of two pieces of ¾ plywood and glued and screws together. This makes for a stiff top. I had a piece of plastic laminate laying around so stuck it down too. An overhang helps with the press(s) mounting and a little knee room is good too. I rest my foot on the shelf.

Plenty of light is good. I found that these articulated light bases fit a piece of ½ copper pipe well and I can put them on the bench surface where I need them and they are out of the way. One has a magnifying glass built in.

I didn’t want my powder measure fixed (and in the way) so I mounted it to a box that will hold a box of bullets for stability and now can put it anywhere I want it.

I generally use two presses most of the time and the other three are stashed. You can see one on it’s storage base under plastic off to the left. That’s where the brass, powder, primers and misc. junk is. No real need to have all of it on the bench top. I cover the holes for the other presses with rubber 12 inch square tiles.

I’ve got little trays near the presses to hold loading trays, bullets etc. The empty eight pound Unique can makes a great waste bucket and fits up under the Rockchucker when I’m brushing the debris off.

I use bread pans obtained a garage sales to hold an assortment of brass during reloading and stackable bamboo boxes to hold bullets. I made up a block that elevates one end to make it easier to get the bullets out.

I have a box that holds the die collection. Three or four sets of the most commonly used always seem to stay on the bench top.

I think it was good advice to keep your loading bench just that and tinker in another location. Hope this may help with your planning. Best regards. Wind
You do not have the required permissions to view the files attached to this post.
alnitak
Senior Levergunner
Posts: 1775
Joined: Tue Sep 04, 2007 7:13 am
Location: Virginia

Re: Reloading bench design help needed

Post by alnitak »

Good ideas and pictures, guys. Keep them coming. Certainly a lot I can use -- overhangs, lights, separate scale area, metal plate, attaching powder dispenser to a weighted box, etc. Good practical stuff. Thanks.

I see a number of you use plywood. Can particle board also be used, maybe as one of the layers with plywood or 1x's (I happen to have a 50" x 24" x 3/4" piece already)?
"From birth 'til death...we travel between the eternities." -- Print Ritter in Broken Trail
Charles
Advanced Levergunner
Posts: 2004
Joined: Sat Dec 15, 2007 2:29 pm
Location: Deep South Texas

Re: Reloading bench design help needed

Post by Charles »

Over the years I have had many handloading benches, some of them temporary and others "make do". When I retired and have my own shop, I did it the way I wanted. I took a 1.75" solid core door and set it on 4X4 legs with 2x4 framing and two shelves. The bottom two by four frame was set on the inside of the legs to give some toe room while standing at the bench. I toped it with a nice 1/4 inch piece of birch and finished the top with Polycrylic from Minwax.

It sits in the middle of the shop so I have access to all four sides. With the shelves filled with brass, cast bullets and the like, it is going nowhere and doesn't need to be bolted to the floor.

I have two other benches with tops from laminated 2x4s standing on edge. They are 6 feet long and 30 inches wide. I build the frames from 2X6s and they are very heav. One is 38 inches high and holds the Logan lathe and the other is 40 inches high and is a general work bench.

I build the loading bench 40 inches high as I prefer to work standing or sitting on a stool. The bench is so large and in the middle of the room, it iends up being a general work bench more than the general work bench I built which is against one wall. I have three presses attatched to one side.

All of my dies, power scales, measures, and various and assorted tools are stored in a large 2 door Cole office storage cabinet. It has an assortment of drawers and shelves that work very well. The bottom two drawers are file draws, but I have build plywood inserts drilled to hold loadng dies. I just pull out the drawer and select the die or dies I want and take them to the bench a few feet away.

The walls of the shop have lots and lots of shelves that hold gun stuff and various others stuff as well. I also have two bookcases, a desk, computor, refrigerator, a lathe, floor drill press and a bench grinder as well. The entire shop is 20x20 and has a door into my bath which leads to my bedroom. It was the garage before I took it over.

I have six light recepticals evenly spaced in the ceiling. I also have a window AC unit built into the wall, a ceiling fan and it has six more light in it. I need some sort of directional goose neck lamp on the lathe bench, but a Surefire flashlight works until I get one.

I have yet to build the casting bench with the vent system, but that is next up for a round tuit.
Wind
Levergunner 2.0
Posts: 474
Joined: Fri Dec 26, 2008 1:10 pm
Location: North Central Washington, USA

Re: Reloading bench design help needed

Post by Wind »

Hey there Alnitak - I'm of the frame of mind that particle board has the structural integrity of wet Hostess Twinkies. Orientated Strand Board (OSB) also falls in this category. Some of the cheaper plywood is suspect. It may have voids in the inner plies that can be a problem, say for example one shows up under the corner of a press you are bolting down. The more expensive marine and cabinet grades are that way partly because all the plies (and usually more of them) are composed of better material. There is a flooring grade 3/4 inch plywood with tongue and groove edges that has so far shown itself to be excellent for bench tops. When you get to the shopping stage of construction, check with your lumber yard on what they have. In the long run, better material usually pays off. Hope this helps. Best regards. Wind
adirondakjack
Senior Levergunner
Posts: 1925
Joined: Mon Dec 17, 2007 7:09 pm
Location: Upstate NY
Contact:

Re: Reloading bench design help needed

Post by adirondakjack »

Another way I have seen work very nicely is to begin with an old steel office desk like ya might find on craigs list or if ya nose around, find some outfit doing a remodel that is tossing them out, and slab a solid wood top on it. Remove the drawer that is above the knee hole so ya can access the bottom side to mount a press, and bingo, ya got a HEAVY bench.
Certified gun nut
User avatar
rusty gunns
Levergunner 2.0
Posts: 140
Joined: Fri Dec 12, 2008 3:12 pm

Re: Reloading bench design help needed

Post by rusty gunns »

I waited until Sears had a sale on tool boxes (The stack kind)

I bought two bottom boxes @ $99 each. (I opted for black, but red was available as well.)

Drilled holes in the bottoms so that I could mount the wheels to roll front to back instead of side to side.

Mounted 2X4's on edge on the tops (front to rear) drilled the lip of the box and screwed them in.

Spread them apart enough to make a 10 foot long bench.

Screwed a 10 foot 2X10 and a 10 foot 2X12 into the edges of the 2X4's atop the tool boxes for the bench top.

Covered that with Masonite (so the surface is replaceable when I gnarl it up).

Its just the right height, wheels and all.

I wound up with lockable draws on both ends and a 4 foot center section to to mount my hornady LnL loader

With the wheels mounted that way, I can unlock the fronts and wheel the whole thing forward, away from the wall.

It cost me about $230 and about 3 hours. 4 if you count the two beers and the BS session with my neighbor.
The problem using historical quotes in your signature is that there is no way to verify its authenticity.
-Abraham Lincoln

Pair of Colt 73 44-40 (1897)
Parker Bros 10 Gauge (1878)
Winchester 73 44-40 (1881)
Marlin 89 38-40 (1891) Marlin 89 44-40 (1891)
Win 92 38-40 (1892)
Win 92 Short Rifle 44-40 (1901)
alnitak
Senior Levergunner
Posts: 1775
Joined: Tue Sep 04, 2007 7:13 am
Location: Virginia

Re: Reloading bench design help needed

Post by alnitak »

Good idea Rusty. I like the idea of built in drawer space for tools, etc.
"From birth 'til death...we travel between the eternities." -- Print Ritter in Broken Trail
Post Reply