Forum rules
Welcome to the Leverguns.Com General Discussions Forum. This is a high-class place so act respectable. We discuss most anything here other than politics... politely.
Please post political post in the new Politics forum.
Very carefully! I'm no authority on this, but I know enough to know that there are many tricks to the trade to make everything come out looking good. There are ways that you angle your chisels and file the inlays, to make the wood/metal fit tight. If you are serious enought to put some time in and take some advice, I would post over on americanlongrifles.org intheir "building section". Some of the greatest longrifle artisans hang out on that site and you will get some good info to get started. Or you can use my redneck learning plan, refuse all advice and just start choppin! The later plan will require more money and time.
Last edited by C. Cash on Wed Dec 10, 2008 10:02 pm, edited 2 times in total.
But God demonstrates his own love for us in this: While we were still sinners, Christ died for us. Romans 5:8
Yes, Thats the way its done. Many today glue them in but origionals were pined in with brads made of the same metal as the inlay and the heads filed down so they dont show.
I have done quite a few myself. You can buy them or saw them from flat stock using a jewelers saw and file the edges true. Store bought inlays need filed too due to rounded edges from the stamping process.
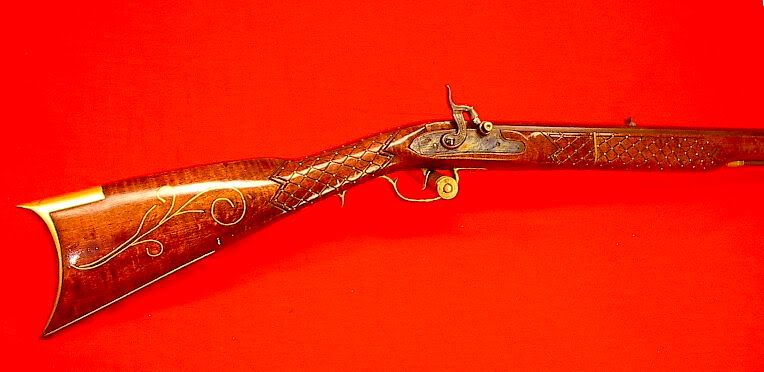
Inlays were quite common in early times as a way to personalize ones rifle gun.
Trace around the inlay using a very sharp and thin blade. It helps if you file a slight taper on the side of the inlay so as it is inletted down into the wood any gaps are taken up by the larger side (out) of the inlay. Does this make any sence to you? Don`t know a better way to explain it.
Another thought. You could also practice on a piece of non-valued walnut or maple, before turning your attention on something that you value. It would be a fun project for sure.
But God demonstrates his own love for us in this: While we were still sinners, Christ died for us. Romans 5:8
C. Cash wrote:Another thought. You could also practice on a piece of non-valued walnut or maple, before turning your attention on something that you value. It would be a fun project for sure.
I thought about it for about 10 seconds. Then I remembered the hundred other hobbies/projects I need to work on. And that doesn't include projects around the house...
Thanks all!
If these walls could talk, I'd listen to the floor.
Those hearts, stars, birds and moons are stock items available from Dixie. As mentioned you bevel the egde of the inlay and angle the recess in the stock so as the inlay is tacked in place it pulls down tight. The tacks or brads used are formed to counter sink in matching holes in the inlay. You want the inlay below the surface of the wood to start then block sand or file the wood, brads and inlay flush.
Here is one I did several years ago using wire inlays. The Wire is really ribbon sharpened on one edge then hammered into a thin channel. One in place the ribbon is filed flush.
I used to do mother of pearl banjo inlays, and did some pretty intricate ones, including a leafy vine snaking the full length of the fingerboard.
The best way to "trace" is to stick your inlays where you want them, then spray on a very fine coat of shellac. Take off your inlay and you have a perfect outline.
It is ideal to be able to cut your base wood so perfectly the inlay just fits, but you may need to do some filling. Mix white glue with sawdust from the base wood and it will fill in any cracks. Then sand the whole thing flush and it will look very good.
With metal shapes that are beveled you might be able to tap them in (which I couldn't do with thin abalone sheets) and that would be even better.
Wood expands when it get wet so you could tap in as best you can, then try a little water and see if the wood fills in the gaps. Metal shrinks when cold; I would freeze the inlay just prior to insertion.
There's a new Dremel tool out that is very light and cordless, it could do very fine detail.
Very interesting to think about.
"I'll tell you what living is. You get up when you feel like it. You fry yourself some eggs. You see what kind of a day it is."
The Stewart MacDonald co. makes a miniature router base for a dremel that makes a slick set up for doing inlay work. The variable speed feature is nice for doing hardwoods. This co. has an online site which sells these router bases for about 50 bucks. I use em mostly to rout saddle slots on guitar bridges.
I'll tell you how I do it and you can go from there...
There are two methods of retaining the inlay, either you use small eschucion pins cut from the same material sa the inlay or you can solder a pin on the back of the inlay. First you place the inlay on the stock and trace arouund it with a very sharp pencil. This is done on the unfiniished stock. Then you cut inside the line with a sharp chisel and smooth the bottom of the inlet with a bottoming chisel. Then you coat the inlay with inletting black and tap it over the inlet and then cut away the outilne. You may do this 3 or 4 times until the inlayy fits perfect in the inlet and is flush or nearly so. now lightly dampen the inlet with water and elmers glue mixed very thin and tap the inlay into place and either pin it or solder on the concealed pin and tap in place. If you use the concealed pin method you use very short pins and you really have to have everything lined up perfect as you tap it home. When the inlay is in place and the wood is totally dry draw file the retaiinng pins and the inlay flush with the wood. Then as you finish the stock the inay is sanded perfectly smooth and the pins disappear as they blend in to the inlay. You always sand over the inlay with a block to keep from dishing and you will sand to 330 or 440 and then steel wool the stock. Then the inlay will shine like a nickle on a goats be hind. My inletting chisles for this work are all hand forged from either tool steel or old screwdrivers but Track of the Wolf has then for about 15.00 each. If the inlay is large or I am doing a patch box the bottom is filed dead smooth with a bottoming file. Once you have the knack you can do an inlay in an hour or so and small ones in 30-40 minutes. Wiire inlay is a whole nother chapter and takes different tools and techniques.