Project Leverguns

Welcome to the Leverguns.Com Forum. This is a high-class place so act respectable. We discuss most anything here ... politely.

Moderators: AmBraCol, Hobie

Forum rules
Welcome to the Leverguns.Com General Discussions Forum. This is a high-class place so act respectable. We discuss most anything here other than politics... politely.

Please post political post in the new Politics forum.
Post Reply
User avatar
Griff
Posting leader...
Posts: 21345
Joined: Sat Mar 31, 2007 4:56 pm
Location: OH MY GAWD they installed a STOP light!!!

Project Leverguns

Post by Griff »

Lets see 'em:

I've posted several time about mine, well... here they are, in all their unfinished glory:

Image

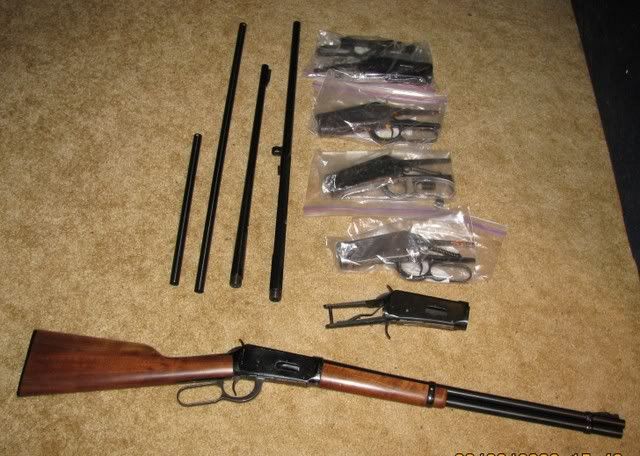
From the top to bottom:

An unused commemorative receiver. It required a little welding to fix a small flaw in the area of the hammer. Still fitting a new breech bolt to it, taking the weld down slowly so as to not go too far! Been watching the various sites to find a new coil spring and strut. Needs a couple of new screws and pins still available from Browning, but... in no rush. I'm thinking of building this as a TD, pistol grip, rifle, two barrels (I'm leaning towards a .32-40 & .38-55), both full mag. Colt1849, I haven't forgot, just waiting for the finances and wood so it can be fitted before sending the receiver out to be modified and finished.

A 1973 receiver that's the pits, literally. It will probably require some professional help. As I haven't been able to remove several buggered screws from it. Currently haven't fitted a link to it, as I'm waiting to see how the metal cleans up. Might be a $40 learning tool... in other words, scrap!

Another new, unused commemorative receiver, will become my son's rifle with pistol gripped stock and the 26" ½ octagon/½ round barrel to its left, half mag; awaits the wood I've had on order forever, then its out to be CCH'd and have it's screws fire-blued. Possibly engraved as the CFO allows! Don't even ask how much these receivers were! :oops:

A plain 1976 receiver complete sans everything in front and behind!

A new, unused 1963 production frame. Have yet to locate the pre-64 style cartridge guides and screws.

A 1972 Winchester 94 carbine. Still needs a couple of small internal parts and the magazine plug, follower and spring. Almost ready to be stripped and sent out for refinishing.

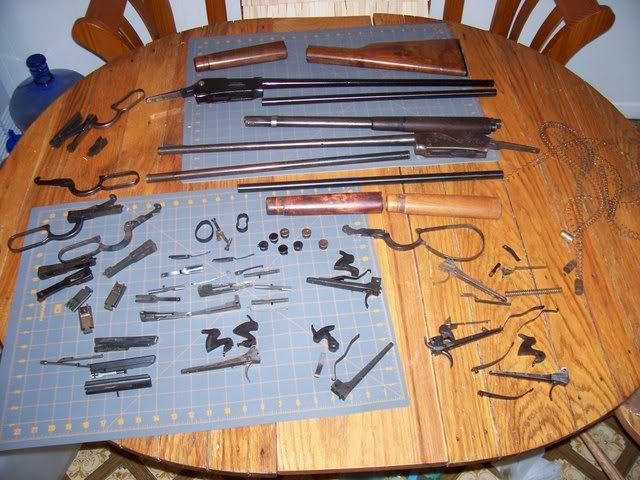
The two barrels to the left of the receivers are a 94 Centennial slated for the son's rifle and a std. 20" carbine barrel, this is the one I'll probably cut for the Trapper. To the left of those are a full length rifle and a half mag (which will be on the son's rifle).

That leaves 3, (4 if I decide on making the TD w/2 bbls), needed and a like number of mag tubes. I'm thinking of making the '63 into another trapper, but I think I'll take a hint and make it 16-¼" to allow 6 cartridges in the tube. I haven't decided which of the last two will be a rifle and which will be a carbine, as I have a buttplate for each.

Each is having a photo record made of its build. But... it's a slow process to both find the correct, useable parts and to fit them into a gun that was either torn down, or has never been fitted before.

Given the variety of parts Winchester used in the originals, it's quite difficult to either bid blind or buy blind from folks that often are unaware of the various differences. I.e.: I bought two lifters from a guy that swore they were cast post-64 parts, yet they were the stamped parts when I opened the envelope. Blued steel carbine buttplates turned out to be raw, unfinished parts; which is better as it's much easier to fit the buttplate to the wood rather than vice versa.

Sights are a whole other ball of wax, or should I say, NIGHTMARE! Seems most on E-Bay are collector pieces by the prices they bring. So other than a couple of tang sights and plain post front sights, those are up in the air. But, I do believe at least one of these will find its way here.

So, what do you have in progress?
Griff,
SASS/CMSA #93
NRA Patron
GUSA #93

There is a fine line between hobby & obsession!
AND... I'm over it!!
No I ain't ready, but let's do it anyway!
Chuck 100 yd
Advanced Levergunner
Posts: 6972
Joined: Tue Apr 03, 2007 8:52 pm
Location: Ridgefield WA. USA

Post by Chuck 100 yd »

I also have several project guns just waiting for the day I will have the time. :wink:
20cows
Advanced Levergunner
Posts: 2278
Joined: Tue Apr 03, 2007 9:55 pm
Location: East West Texas

Post by 20cows »

It can be habit forming.

Image[/quote]
User avatar
Ysabel Kid
Moderator
Posts: 28848
Joined: Mon Sep 17, 2007 7:10 pm
Location: South Carolina, USA
Contact:

Post by Ysabel Kid »

You guys are my heroes! :D


Someday...
Image
User avatar
Griff
Posting leader...
Posts: 21345
Joined: Sat Mar 31, 2007 4:56 pm
Location: OH MY GAWD they installed a STOP light!!!

Post by Griff »

Chuck 100 yd wrote:I also have several project guns just waiting for the day I will have the time. :wink:
Well, you know this site is photo driven... what are ya workin' on?
Griff,
SASS/CMSA #93
NRA Patron
GUSA #93

There is a fine line between hobby & obsession!
AND... I'm over it!!
No I ain't ready, but let's do it anyway!
User avatar
JReed
Advanced Levergunner
Posts: 5509
Joined: Tue Apr 03, 2007 11:17 am
Location: SoCal

Post by JReed »

Y'all are the coolest. Wish I had the time and funds to do projects like those.
Jeremy
GySgt USMC Ret

To err is human, To forgive is devine, Neither of which is Marine Corps policy
Semper Fidelis
mescalero1
Advanced Levergunner
Posts: 4923
Joined: Sat Dec 22, 2007 1:08 am
Location: Arizona headed for New Mexico

Post by mescalero1 »

You should see my gun room!
you guys have nice stuff,
girlfriend thinks the room should be declared a disaster area
User avatar
Ysabel Kid
Moderator
Posts: 28848
Joined: Mon Sep 17, 2007 7:10 pm
Location: South Carolina, USA
Contact:

Post by Ysabel Kid »

mescalero1 wrote: ...girlfriend thinks the room should be declared a disaster area
Which just means you're on the right track. Your goal is - at least when you get married - that they are afraid to go into your gun room! :wink:
Image
User avatar
Griff
Posting leader...
Posts: 21345
Joined: Sat Mar 31, 2007 4:56 pm
Location: OH MY GAWD they installed a STOP light!!!

Post by Griff »

Ysabel Kid wrote:
mescalero1 wrote: ...girlfriend thinks the room should be declared a disaster area
Which just means you're on the right track. Your goal is - at least when you get married - that they are afraid to go into your gun room! :wink:
No, no... they should not be afraid, mine had bad a experience early in her shooting career, her brother was an idiot, who puts a 115lb slip of a girl behind a scoped 7mmRemMag as her first shooting experience? Gotta give her credit, she was still game and loved my .30-30; hey, wait, wonder if that was why she married me! :oops:

During the her 6th year of competition she finally won her first individual plaque:
Image

Now, if only I could get mine to add "Reloading" to her skill set! :lol: :P
Griff,
SASS/CMSA #93
NRA Patron
GUSA #93

There is a fine line between hobby & obsession!
AND... I'm over it!!
No I ain't ready, but let's do it anyway!
Leverdude
Senior Levergunner
Posts: 1518
Joined: Tue Apr 03, 2007 6:25 pm
Location: Norwalk CT

Post by Leverdude »

I need to take a few updated pictures. I posted a few pics a coupla weeks back of partially fitted buttstocks on a 1894 & 1889 Marlin. Theyre fitted completely & sanded now. The 1894 as soon as I get around to it will get sent out for lineing & barrel installing. The 1889 needs some lock work.
I couldn't find an 1889 triger & sear so I shoved a 336 triger in it & it works fine with very little fitting. Except its a tad taller than the original & the hammer dont always engage full cock. I need to shorten the sear a tad.
I have a clockmaker friend around the corner, after I screw it up I may call on him to fix it. Unless I dont, then I wont.

But other than general tinkering thats what I got going on, a 1894 25/20 carbine & a 1889 38/40 rifle. You'll just have to take my word on it for the moment.
mescalero1
Advanced Levergunner
Posts: 4923
Joined: Sat Dec 22, 2007 1:08 am
Location: Arizona headed for New Mexico

Post by mescalero1 »

Leverdude,
This might be a lot ask, but can you pass on a few tips about fitting crescent butt plates?
Yesabel Kid,
You said the " M " word, go wash your keyboard with lye soap!
BenT
Advanced Levergunner
Posts: 2732
Joined: Thu Sep 06, 2007 9:21 pm
Location: Northern Wisconsin

Post by BenT »

Going to a gunshow today to look for more parts to convert post 64- 94 from 30-30 carbine to 26''octagon 38-55 rifle. The big pieces are easy to find . It's the little pieces that hard. All other projects are on hold till I get this one done.
Leverdude
Senior Levergunner
Posts: 1518
Joined: Tue Apr 03, 2007 6:25 pm
Location: Norwalk CT

Post by Leverdude »

mescalero1 wrote:Leverdude,
This might be a lot ask, but can you pass on a few tips about fitting crescent butt plates?
Yesabel Kid,
You said the " M " word, go wash your keyboard with lye soap!
Sure,,, I guess. I'm not an expert. What is it you'd like to know? Are you starting with a flat buttstock or a semi inletted one?
Noah Zark
Senior Levergunner
Posts: 1334
Joined: Sun Oct 07, 2007 11:03 am
Location: PA

Post by Noah Zark »

20cows wrote: Image

Some assembly required . . .

Noah
Might as well face it, you're addicted to guns . . .
mescalero1
Advanced Levergunner
Posts: 4923
Joined: Sat Dec 22, 2007 1:08 am
Location: Arizona headed for New Mexico

Post by mescalero1 »

Semi- inlet
User avatar
Grizz
Advanced Levergunner
Posts: 12854
Joined: Fri Aug 31, 2007 7:15 pm

Post by Grizz »

Griff,

I still haven't gotten the barrel free from this .44 mag B-92, but I aim to.

Image

The 405g Redhawk load drops right into the chamber, so my goal is to make it feed properly. I have hopes that I can because the action already feeds the 325g cast flawlessly, which is longer than factory specs.
Last edited by Grizz on Sat Mar 08, 2008 3:32 pm, edited 1 time in total.
grizz

He is Risen
He is Alive

https://jesus-is-savior.com/
Leverdude
Senior Levergunner
Posts: 1518
Joined: Tue Apr 03, 2007 6:25 pm
Location: Norwalk CT

Post by Leverdude »

mescalero1 wrote:Semi- inlet
If you get a butstock that matches the plate its very straight forward & will be a close fit as is.

The last 2 I did that wasn't the case. I had original patern 90% inletted stocks & modern Marlin buttplates.

It wasn't a very close fit but not hard to get right. Just time consuming.
The part of my plates that extended over the top were longer by 3/16's or so than the pattern. The first thing I did was lengthen the flat cut on top to the proper length. Thats where this pic was taken.
Image

From that point I covered the toe of the plate with prussian blue because I didn't have inletting black & this works for me as well.
Once the part making FIRST contact was coated with marking goop I held the top tang of the plate snug on the top cut of the stock & slide it down straight until it makes contact. Remove the plate & file away the marks. Keep on repeating the process until Its hitting somewheres else. Once that happens I cover the entire mateing surface with marking goop to find the new high spots. Go very easy fileing away the marks. Eventually you want it to hit everywhere. I never have but try till it looks like this,
Image

I'v never gotten anything to leave an even mark all the way around. I'm sure its possible but I seem to just chase small gaps around the gun. Once I'm convinced its as close as my ability will allow I drill the screw holes VERY CAREFULLY! If they are nice & square & hold the plate like I wanted I coat the plate inside, around all edges & inside the screw holes & the screws too with release agent. Then I mix up some acraglass & tint it brown. Spread it On the end of the stock avoiding the screw holes but being sure its applied all around the peremiter. I try & put it thick enough above the screw hole that it fills the butplate recess entirely up there. In my mind thats gotta meke it want to stay put more than just the screws.
Then I install the plate & screw it down tight. If I didn't screw up the glass will ooze out everywhere around the plate.

Do all this BEFORE doing any shaping of the stock. That way the wood will be high around the plate & you can file it to shape with the hardened glass already there & it'll come out about as perfect as it can. I file it until the file just starts touching the metal & then complete the shaping on other areas of the wood. After that I start with 60 grit paper useing a block, then 100, then 220. By then it should be about perfect & I'll go over it once more with 400 just to smooth it a little more & it should be ready for finishing.

I'll see if I cant find me camera. Both the stocks pictured here are now completely shaped & prepped for finishing.

I hope this shed some light on things. If theres anything more I might could help with let me know. Anybody having their own suggestions, feel free to speak up, I'm not an expert & figured this stuff out trial & error & I'm sure I have a lot to learn yet.
Yance
Levergunner 2.0
Posts: 143
Joined: Fri Sep 07, 2007 10:05 pm

Post by Yance »

mescalero1 wrote:You should see my gun room!
you guys have nice stuff,
girlfriend thinks the room should be declared a disaster area
Good to know I'm not the only one with that problem.<G>
Yance

There's a fine line between "Hobby" and "Mental Illness".

outawaysforge.wordpress.com

"Gun control" isn't about guns, it's about "control".
mescalero1
Advanced Levergunner
Posts: 4923
Joined: Sat Dec 22, 2007 1:08 am
Location: Arizona headed for New Mexico

Post by mescalero1 »

Leverdude,
I cannot thank you enough, I thought that was the way it should work.
I wanted to make sure to engage brain before engaging tool!
mescalero1
Advanced Levergunner
Posts: 4923
Joined: Sat Dec 22, 2007 1:08 am
Location: Arizona headed for New Mexico

Post by mescalero1 »

Grizz,
Who did that to that barrel?
User avatar
Griff
Posting leader...
Posts: 21345
Joined: Sat Mar 31, 2007 4:56 pm
Location: OH MY GAWD they installed a STOP light!!!

Post by Griff »

Grizz wrote:Griff,
I still haven't gotten the barrel free from this .44 mag B-92, but I aim to.
The 405g Redhawk load drops right into the chamber, so my goal is to make it feed properly. I have hopes that I can because the action already feeds the 325g cast flawlessly, which is longer than factory specs.
Sometimes, heat is required to expand the part. This is a situation in which I call upon a pro.
Griff,
SASS/CMSA #93
NRA Patron
GUSA #93

There is a fine line between hobby & obsession!
AND... I'm over it!!
No I ain't ready, but let's do it anyway!
20cows
Advanced Levergunner
Posts: 2278
Joined: Tue Apr 03, 2007 9:55 pm
Location: East West Texas

Post by 20cows »

I'v never gotten anything to leave an even mark all the way around. I'm sure its possible but I seem to just chase small gaps around the gun.
Been there more than once!
Post Reply