Proper Rollcrimp Adjustment - Updated

Welcome to the Leverguns.Com Forum. This is a high-class place so act respectable. We discuss most anything here ... politely.

Moderators: AmBraCol, Hobie

Forum rules
Welcome to the Leverguns.Com General Discussions Forum. This is a high-class place so act respectable. We discuss most anything here other than politics... politely.

Please post political post in the new Politics forum.
Post Reply
User avatar
Griff
Posting leader...
Posts: 20859
Joined: Sat Mar 31, 2007 4:56 pm
Location: OH MY GAWD they installed a STOP light!!!

Proper Rollcrimp Adjustment - Updated

Post by Griff »

Seating/crimp adjustments aren't hard, tedius, yes, but simple, if you follow simple instructions. Taking one thing at a time, as trying to adjust both seating and crimp depths at the same time will make you pull your hair out. The following is a very short photo essay on my method. (May not be "proper", but I find it works very well for me).

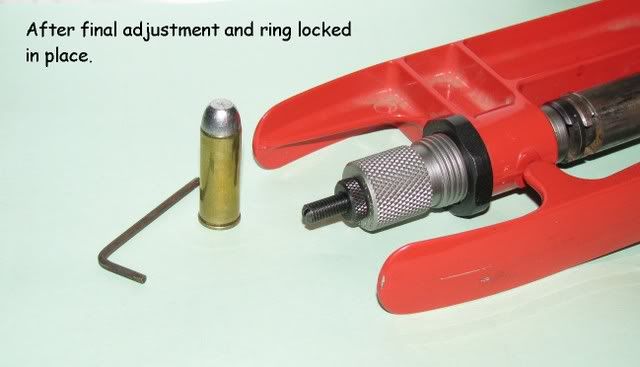
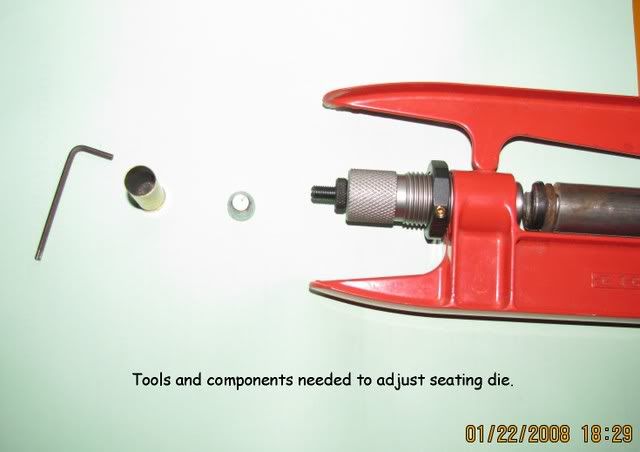
I'm using this Lee Handloader I've had for about 15 or so years instead of one on my bench, as it was handy, and initially, this was done quickly; the die is from a new set of .45Colt I bought from a fellow Levergunner thru the forum and until this, unused.

The bullet is a Rucker 200gr RFN I load for my .45 Colt EMF/Rossi "Short Rifle". The case is once or twice or ?? fired Winchester I had sitting around. Before the photos began I sized and de-primed the case, then expanded & belled the case using this same RCBS carbide die set.
Image

Image
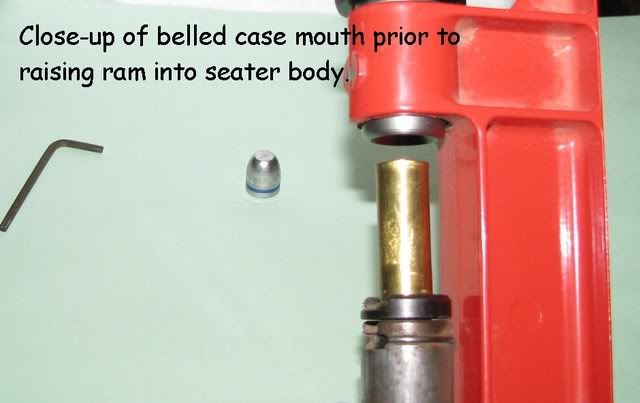
Install the seat/crimp die, but leave the body backed out a tad, at least to the point where your belled empty case won't begin to crimp. Keep the lock ring on the body and the seater stem loose at this point... makes for easier adjustments. Now, set a bullet in the case mouth, and run it up the seater die... until the bullet is seated to the depth where the bullet is seated to the crimp groove. This will take several adjustments, no need to try to do it all in one big move, as if you push the bullet in too far, you have to pull it back out... and start over. (As I did below)! You want the bullet seated to the point at which, had the die body been in the correct position, the case would be crimped into the crimp groove.

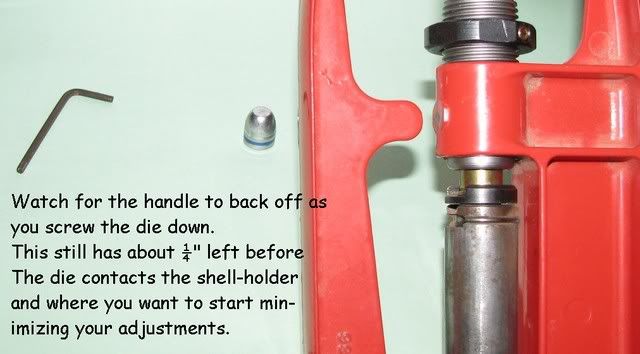
At this point, back out the seater stem several turns, and with the ram of the press up, screw down the seater/crimp die so that the body of the die contacts the case mouth. At this point you don't want the seater stem contacting the bullet, you just want the die body touching. By hand, turn the body of the die about a ¼ turn, this should just begin to push the ram down. Slowly, push the ram back up into the die, pushing the case into the crimping protusion inside the die. Lower the ram and inspect your seated, crimped bullet. If it crimped to the depth you want, tighten the lock ring on the die. If not, move the die in the direction you need for more (down), or less (up) crimp depth. When you get the crimp set correctly, and you'll want to verify that locking the lock ring in place doesn't change that crimp depth, THEN, and only then do you return to adjusting the seating depth. And it's easy, with the seated, crimped bullet in place on the ram, run the ram up into the seater/crimp die, and turn the seater stem down to where the seater meets the bullet. I'd tell you, "...and a tiny bit more..." but you might over do it. But, you'll need a further adjustment, as everything seems to move just the faintest of hairs as you turn the lock rings into place. One word, here about the lock rings... if you tighten them tight against the press, and tighten their set screw, you'll not get the die off the press until you loosen the lock ring. So, always just make the slightest of contact with the lock ring, thus you can remove your dies by hand alone... no need to get a pipe wrench and wreak havoc on the darned things. They ain't expensive, but, why?

Same, but different on the seating stem, there you want to have the lock ring pretty much require a wrench to loosen it. But, remember, as you tighten that lock ring, you'll be moving the stem UP away from the bullet the tiniest of amounts, due to the thread against thread... so you'll need to put another case and bullet thru the loading process (sans primer and powder) to ensure that everything's in adjustment and repeatable. Those two "dummy" rounds stay in the die set box for future reference. In my case, I load about 6 different .451 bullets in .45Colt, so I have "dummy" rounds in that .45Colt die box for each bullet type. This makes setting the seating depth easy for each bullet type.

Image

Image

Image

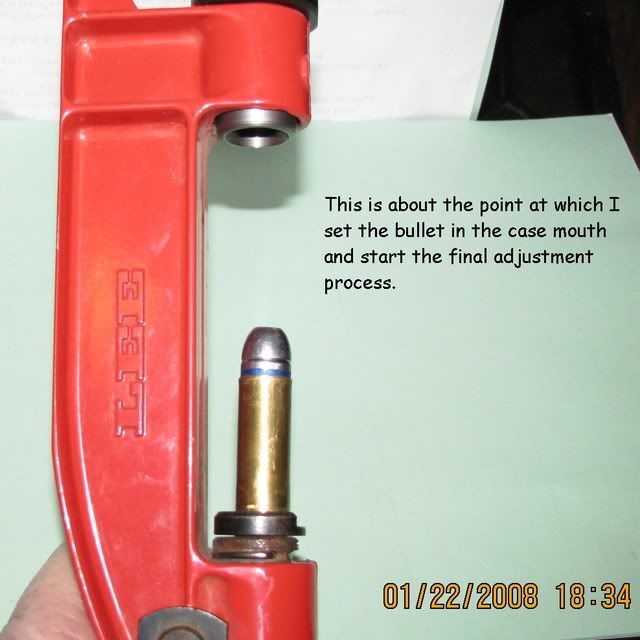
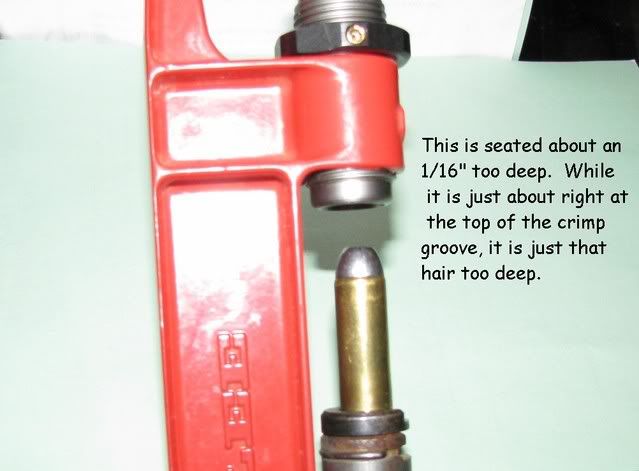
After pulling the bullet I reset the seating plunger a little higher ran it back in the seater, and viola! A complete round, no problems.
Image
Last edited by Griff on Tue May 28, 2013 3:57 pm, edited 2 times in total.
Griff,
SASS/CMSA #93
NRA Patron
GUSA #93

There is a fine line between hobby & obsession!
AND... I'm over it!!
No I ain't ready, but let's do it anyway!
User avatar
J Miller
Member Emeritus
Posts: 14885
Joined: Sat Mar 31, 2007 7:46 pm
Location: Not in IL no more ... :)

Post by J Miller »

Griff,

That's a pretty good set of instructions. Good pics too.

Joe
***Be sneaky, get closer, bust the cap on him when you can put the ball where it counts ;) .***
Scott64A
Levergunner 2.0
Posts: 465
Joined: Fri Sep 07, 2007 12:53 pm
Location: NE Georgia

Post by Scott64A »

Wow, this one got buried quickly...
I hadn't seen this unitl today.
I wish I had read this simple set before tinkering the other day.
Ah well, it reinforces the lesson that much more.

Thanks, Griff.
User avatar
J Miller
Member Emeritus
Posts: 14885
Joined: Sat Mar 31, 2007 7:46 pm
Location: Not in IL no more ... :)

Post by J Miller »

You know, I'm not braggin or nuthin, but I got one of them purty Lee tools too. I keep it in a tool box with a Lee Deluxe 4 Die 45 Colt set, and a few other tools.

My thought was that if I ever got out to do any extended camping I'd take it and some components and just reload my cases.
All my tools and supplies, a pound of powder or two, bullets and primers will fit in the small tool box.
So far I haven't even got the dies adjusted in it. :oops:

Some day.

Joe
***Be sneaky, get closer, bust the cap on him when you can put the ball where it counts ;) .***
User avatar
JReed
Advanced Levergunner
Posts: 5509
Joined: Tue Apr 03, 2007 11:17 am
Location: SoCal

Post by JReed »

Thanks for the leason Griff. Much better instructions then you normaly get with a die set. :D
Jeremy
GySgt USMC Ret

To err is human, To forgive is devine, Neither of which is Marine Corps policy
Semper Fidelis
User avatar
olyinaz
Advanced Levergunner
Posts: 3978
Joined: Sat Nov 28, 2009 2:19 pm
Location: Tucson, AZ

Re: Proper Rollcrimp Adjustment

Post by olyinaz »

Thanks!
Cheers,
Oly

I hope and pray someday the world will learn
That fires we don't put out will bigger burn

Johnny Wright
Nath
Advanced Levergunner
Posts: 8660
Joined: Sat Sep 08, 2007 1:41 pm
Location: England

Re: Proper Rollcrimp Adjustment

Post by Nath »

Oh,,,, I don't have my 357 expander actually belling the case mouth!!

So should I???

Thanks.

N.
Psalm ch8.

Because I wish I could!
User avatar
Griff
Posting leader...
Posts: 20859
Joined: Sat Mar 31, 2007 4:56 pm
Location: OH MY GAWD they installed a STOP light!!!

Re: Proper Rollcrimp Adjustment

Post by Griff »

Nath wrote:Oh,,,, I don't have my 357 expander actually belling the case mouth!!
So should I???
Thanks.
N.
My answer is a definite, qualified, "maybe?" If you're using a bevel based bullet or a jacketed bullet, it may not be quite as necessary as I think it is with plain based lead projectiles. Also, if you're chamfering the inside of the case mouth, you're providing a bit of a 'ramp' for the bullet to become your expander without shaving either lead or copper from the bullet. If you're shaving lead or copper from the base of the bullet, yes, definitely let the expander do a little belling. It makes getting the bullet started into the case SO much easier.
Griff,
SASS/CMSA #93
NRA Patron
GUSA #93

There is a fine line between hobby & obsession!
AND... I'm over it!!
No I ain't ready, but let's do it anyway!
Nath
Advanced Levergunner
Posts: 8660
Joined: Sat Sep 08, 2007 1:41 pm
Location: England

Re: Proper Rollcrimp Adjustment

Post by Nath »

Cheers Griff, I just adjusted the expander to give a little belling so if that tight grouping load I tested the other day goes to poop and I can afford the gas I'll be coming for you :lol:


N :wink:
Psalm ch8.

Because I wish I could!
User avatar
Griff
Posting leader...
Posts: 20859
Joined: Sat Mar 31, 2007 4:56 pm
Location: OH MY GAWD they installed a STOP light!!!

Re: Proper Rollcrimp Adjustment

Post by Griff »

Nath wrote:Cheers Griff, I just adjusted the expander to give a little belling so if that tight grouping load I tested the other day goes to poop and I can afford the gas I'll be coming for you :lol:
N :wink:
Ought not change anything... except for the better if you'd had any issues by buggerin' up the bases by not belling! I might move around a lot, but I'm not hard to find... Waft a cas of BP around, I'll come runnin'!
Griff,
SASS/CMSA #93
NRA Patron
GUSA #93

There is a fine line between hobby & obsession!
AND... I'm over it!!
No I ain't ready, but let's do it anyway!
User avatar
Sixgun
Posting leader...
Posts: 18703
Joined: Sun Sep 16, 2007 7:17 pm
Location: S.E. Pa. Where The Finest Winchesters & Colts Reside

Re: Proper Rollcrimp Adjustment

Post by Sixgun »

This post has got to set some kind of a record for "oldest post resurrected". :D

But............good information is good forever, or at least as long as its legal to reload.-----------6
1st. Gen. Colt SAA’s, 1878 D.A.45 and a 38-55 Marlin TD

Image
Nath
Advanced Levergunner
Posts: 8660
Joined: Sat Sep 08, 2007 1:41 pm
Location: England

Re: Proper Rollcrimp Adjustment

Post by Nath »

Griff wrote:
Nath wrote:Cheers Griff, I just adjusted the expander to give a little belling so if that tight grouping load I tested the other day goes to poop and I can afford the gas I'll be coming for you :lol:
N :wink:
Ought not change anything... except for the better if you'd had any issues by buggerin' up the bases by not belling! I might move around a lot, but I'm not hard to find... Waft a cas of BP around, I'll come runnin'!
Lol. You know I respect you really :wink:

N.
Psalm ch8.

Because I wish I could!
Milano
Levergunner
Posts: 4
Joined: Tue May 06, 2008 6:25 pm

Re: Proper Rollcrimp Adjustment

Post by Milano »

Hello, I don't want to hijack this thread but along these lines of crimp adjustment I am having an issue.

I have an Uberti 73 carbine that i am reloading for and about 1/3 of my loaded rounds are telescoping into the case. I am using 0.429 200 gr Nosler Jacketed HP. I know that the manuals say 0.427 but the barrel slugged to 0.429. Cases are uniformed. And I am using the RCBS seater die THEN a Redding Taper crimp die separately.

I can feel the crimp die working and the rounds look good but obviously are not passing muster after a few weeks of being in the rifle. Maybe this is an issue. I am a rancher and the rifle is always loaded, with 6 or 7 of the 9 capacity, behind the seat of my truck. This is the first time I am using JHP instead of Lead FP. Any thoughts or ideas would be great.
User avatar
Griff
Posting leader...
Posts: 20859
Joined: Sat Mar 31, 2007 4:56 pm
Location: OH MY GAWD they installed a STOP light!!!

Re: Proper Rollcrimp Adjustment

Post by Griff »

Nath wrote:
Griff wrote:
Nath wrote:Cheers Griff, I just adjusted the expander to give a little belling so if that tight grouping load I tested the other day goes to poop and I can afford the gas I'll be coming for you :lol:
N :wink:
Ought not change anything... except for the better if you'd had any issues by buggerin' up the bases by not belling! I might move around a lot, but I'm not hard to find... Waft a cas of BP around, I'll come runnin'!
Lol. You know I respect you really :wink:
N.
Oh sure... I could feel the respect right over the 'net! :P :lol: :lol: :lol: Since my GGGrandpa is from Putney, I'll refrain from any snide remarks about bloody... :twisted: :shock: :lol:
Milano wrote:Hello, I don't want to hijack this thread but along these lines of crimp adjustment I am having an issue.
I have an Uberti 73 carbine that i am reloading for and about 1/3 of my loaded rounds are telescoping into the case. I am using 0.429 200 gr Nosler Jacketed HP. I know that the manuals say 0.427 but the barrel slugged to 0.429. Cases are uniformed. And I am using the RCBS seater die THEN a Redding Taper crimp die separately.
I can feel the crimp die working and the rounds look good but obviously are not passing muster after a few weeks of being in the rifle. Maybe this is an issue. I am a rancher and the rifle is always loaded, with 6 or 7 of the 9 capacity, behind the seat of my truck. This is the first time I am using JHP instead of Lead FP. Any thoughts or ideas would be great.
I've got a few questions:

Is the rifle sitting upright? And how rough are the roads... a lot of jumpin' up and down could be the cause your bullets are jumpin' the crimp.

Are you using a bullet with a crimp groove? The taper crimp die alone might not be giving you a deep enough crimp. Does your seater die a combo seater/crimper die? If so, you might just want to try adjusting that seater body down a tad to get a roll, and raise the seater plug to adjust for that extra depth of the body.

Your expander plug might be a bit oversize, even for a .429 bullet. On my .45Colts, even without any crimp, it takes 2 solid whacks on a kinetic bullet puller to get a bullet to come out of a case, just from neck tension alone.
Griff,
SASS/CMSA #93
NRA Patron
GUSA #93

There is a fine line between hobby & obsession!
AND... I'm over it!!
No I ain't ready, but let's do it anyway!
Milano
Levergunner
Posts: 4
Joined: Tue May 06, 2008 6:25 pm

Re: Proper Rollcrimp Adjustment

Post by Milano »

Thank you Griff for the reply. The roads are rough dirt roads. Some water bars, bumps, rocks, etc. The rifle lays in a scabbard, sights down. And with the traditional Lead RNFP the rounds have never telescoped. The only difference is that lead round have the "Grease Goove" Crimp Groove while the JHP have the "Serrated" Crimp Groove.

The seater die I have does have the Crimp in it however I was told that a separate crimp is usually more consistant for COAL. I don't know. I am used to non crimp rounds like 308, 7 Mag, etc.

What should my expander plug measure?

Any other suggestions and help are greatly appreciated.
User avatar
Griff
Posting leader...
Posts: 20859
Joined: Sat Mar 31, 2007 4:56 pm
Location: OH MY GAWD they installed a STOP light!!!

Re: Proper Rollcrimp Adjustment

Post by Griff »

Milano wrote:Thank you Griff for the reply. The roads are rough dirt roads. Some water bars, bumps, rocks, etc. The rifle lays in a scabbard, sights down. And with the traditional Lead RNFP the rounds have never telescoped. The only difference is that lead round have the "Grease Goove" Crimp Groove while the JHP have the "Serrated" Crimp Groove.

The seater die I have does have the Crimp in it however I was told that a separate crimp is usually more consistant for COAL. I don't know. I am used to non crimp rounds like 308, 7 Mag, etc.

What should my expander plug measure?

Any other suggestions and help are greatly appreciated.
Pictures are worth a thousand words... A picture of the bullet you're having trouble with would be a help. As for consistency... I don't have a problem using a combination die... however, your case length needs to be consistent also! A Lee FCD kinda allows for us to be lazy in that regard.

I don't know what a .44 Mag expander plug should measure... but I'd figure somewhere in the .425 range, as it should still give plenty of neck tension, with the bell going out to over .433 to allow even .431 bullets to seat without shaving lead... but... I'm just guessing... maybe someone that loads for the .44 can chime in.
Griff,
SASS/CMSA #93
NRA Patron
GUSA #93

There is a fine line between hobby & obsession!
AND... I'm over it!!
No I ain't ready, but let's do it anyway!
Post Reply